Turquoise Fronted Amazon: The Big Personality in a Green Suit
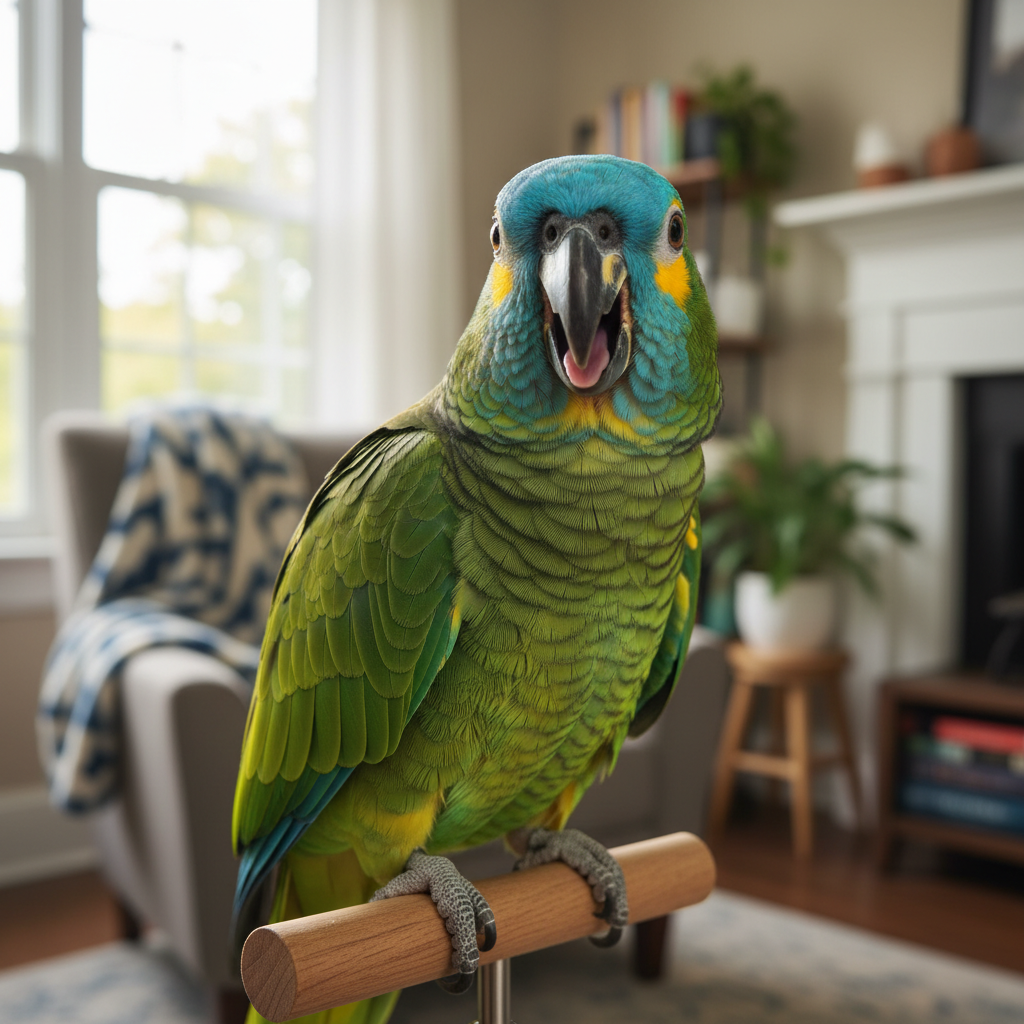
A Turquoise Fronted Amazon being its loud, hilarious self in a home environment.
If you want a bird that can light up your living room, hold a full-blown conversation, and still throw a toddler-level tantrum when bedtime hits… let’s talk about the Turquoise Fronted Amazon.
This striking green parrot (also called the Blue-fronted Amazon) is beautiful, loud, clever, and definitely not a decorative pet. It’s a long‑term roommate with opinions.
In this guide, we’ll cover what they are, how they live, what they need, and whether you’re actually ready for one.

Distinctive turquoise and yellow facial markings make each Blue-fronted Amazon look uniquely “custom.”
What Is a Turquoise Fronted Amazon?
The Turquoise Fronted Amazon (Amazona aestiva) is a medium-to-large parrot native to South America, especially Brazil, Paraguay, Bolivia, and northern Argentina. In many bird books and websites, you’ll see it called the Blue-fronted Amazon—same bird, slightly fancier name.
Quick profile
- Common names: Turquoise Fronted Amazon, Blue-fronted Amazon
- Scientific name: Amazona aestiva
- Size: About 15–17 inches (38–43 cm) from head to tail
- Weight: Roughly 10–19 oz (300–550 g)
- Lifespan: Often 40+ years in captivity; some reach 60–70 years with good care
- Noise level: High (they’re Amazons… silence is not their thing)
- Personality: Confident, social, intelligent, sometimes sassy or hormonal
This is not a starter bird. It’s more like adopting a flying 4‑year‑old with a beak.

Classic Turquoise Fronted Amazon coloration: rich green body, turquoise forehead, yellow accents, and bold wing patches.
What Do They Look Like?
Imagine a mostly bright green bird, then splash on:
- Blue to turquoise feathers on the forehead and around the face
- Yellow around the cheeks or crown (amount varies between individuals)
- Red and blue patches on the wings (especially the bend of the wing)
- A sturdy, hooked beak for cracking nuts, shredding toys, and occasionally reminding you who’s boss
Coloration can vary a lot—some individuals have more blue on the face, others more yellow. That’s part of the charm: each Turquoise Fronted Amazon looks a bit custom.
If you want a parrot that stands out without being neon, this species hits that sweet spot.
Big brain, big voice: these parrots turn any room into their personal stage.
Personality: Why People Fall in Love (and Sometimes Panic)
People don’t pick Turquoise Fronted Amazons just because they’re pretty. They pick them because they’re characters.
Typical traits:
- Very social: They thrive on interaction and can form intense bonds with their favorite humans.
- Smart and curious: They enjoy puzzles, new toys, and figuring out how to open basically anything that should be bird-proof.
- Vocal and expressive: They don’t just mimic; they comment, yell, sing, and sometimes argue.
- Occasional mood swings: Hormonal seasons (often in spring) can bring on territorial or nippy behavior.
You come home from work. Your Turquoise Fronted Amazon hears your keys, screams your name (or its version of it), then demands a head scratch, then tosses its food dish just to keep things interesting.
If you want a quiet, decorative pet, wrong bird. If you want a feathered roommate with a big personality, you’re in the right place.
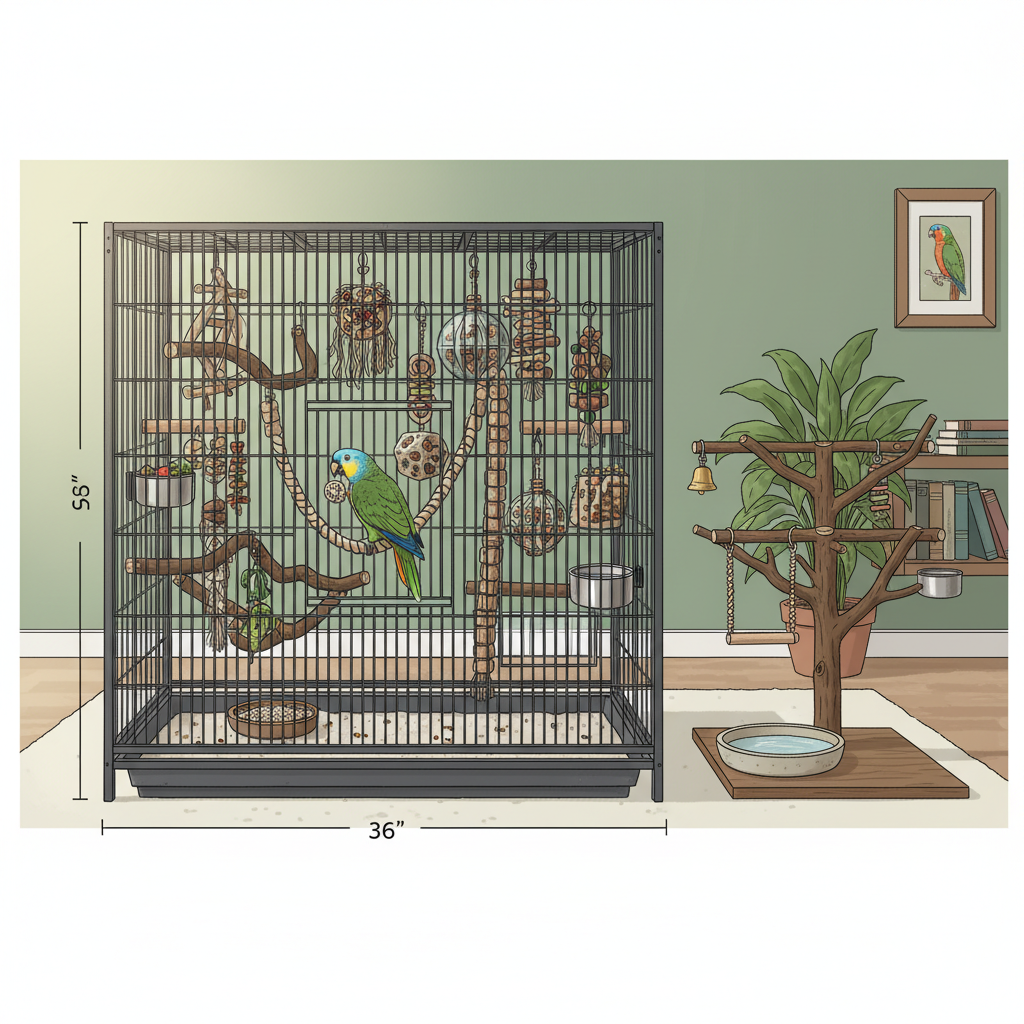
An enriching “mini playground” setup does far more for behavior than any decorative cage could.
Are Turquoise Fronted Amazons Good Talkers?
Short answer: yes, often.
Turquoise/Blue-fronted Amazons are known for:
- Clear speech when they decide to mimic human words
- A mix of whistles, songs, and environmental sounds (phone rings, microwaves, doorbells, the works)
- Using phrases in context—sometimes eerily so (many owners report their birds using greetings or names appropriately)
But there’s a catch:
- Not every individual becomes a great talker.
- You cannot guarantee talking ability.
- You can almost guarantee noise: squawks, calls, and excited screaming sessions are part of Amazon life.
Come for the talking potential, stay for the chaos. Just don’t bank on getting a quiet poet; you might get a loud comedian.
How Long Do Turquoise Fronted Amazons Live?
Parrots are a long game, and Turquoise Fronted Amazons are no exception.
With proper care, they can live:
- 40–50 years quite commonly
- 60+ years in some cases
This means your bird may:
- Outlive multiple dogs and cats
- Join you through major life stages (school, careers, relationships, relocations)
- Potentially need a care plan or designated guardian in your will
This isn’t a 5‑year commitment. It’s more like adding a family member you’ll need to plan for.
Housing: Cage Size and Environment
A Turquoise Fronted Amazon might not be a macaw, but it still needs space.
Minimum cage guidelines (bigger is better):
- At least 36″ wide x 24″ deep x 48″ high (91 x 61 x 122 cm) for one bird
- Bar spacing: Around 3/4″ to 1″ (1.9–2.5 cm)
- Strong, bird-safe metal construction—these birds have powerful beaks
Essential setup:
- Multiple perches of different diameters and textures (natural wood is ideal)
- Toys for chewing and foraging (cardboard, untreated wood, vegetable‑tanned leather)
- Food and water dishes placed to avoid contamination by droppings
- Out-of-cage time: Aim for several hours a day of supervised freedom and interaction
Environmental tips:
- Keep away from drafts, cigarette smoke, aerosols, Teflon/non-stick fumes, and kitchens.
- Provide natural light or full-spectrum bird-safe lighting to help regulate hormones and mood.
Think “mini playground,” not “decorative cage in the corner.” The environment shapes behavior.
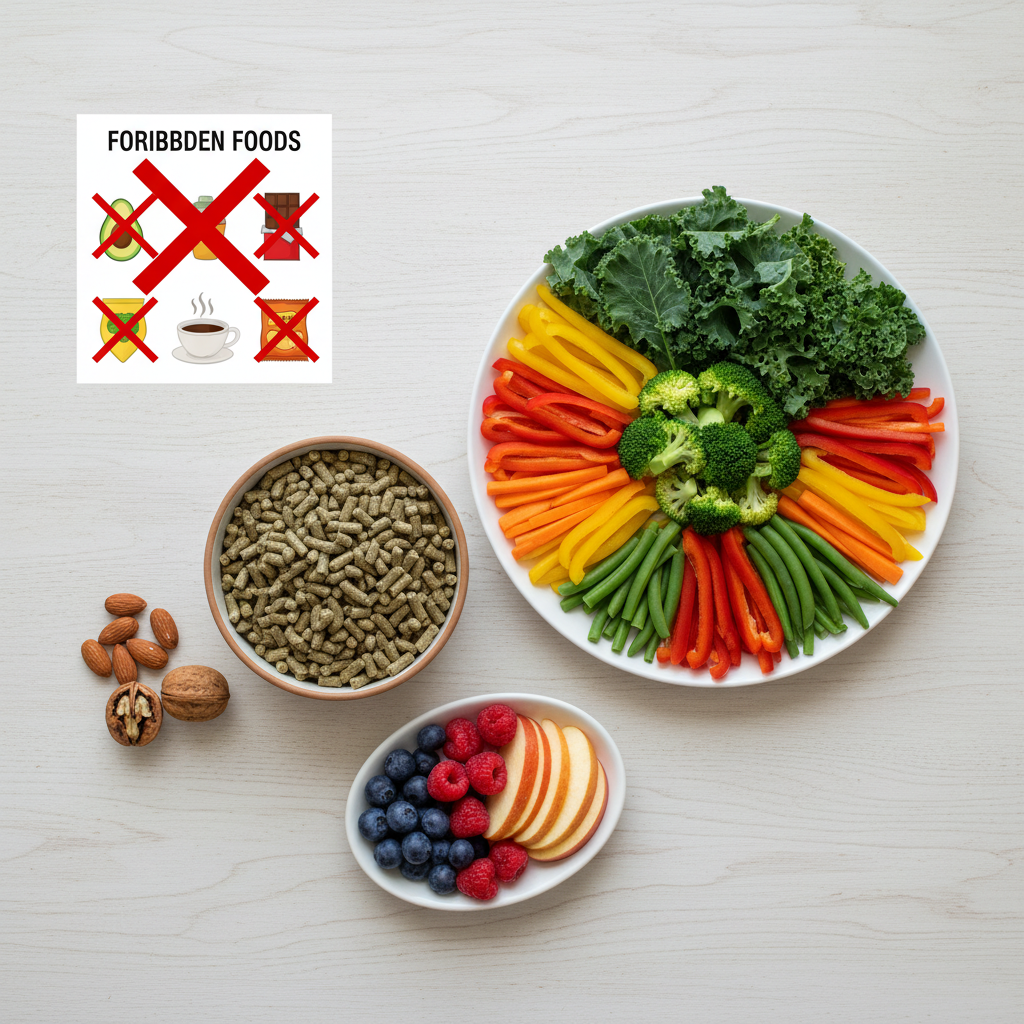
A colorful, balanced plate keeps your Amazon’s body healthy and its brain busy.
Diet: What Should a Turquoise Fronted Amazon Eat?
If you feed only seeds, you’re basically giving your bird a permanent junk‑food diet.
A balanced Turquoise Fronted Amazon diet typically includes:
-
High-quality pellets (about 50–70% of the diet)
- Formulated parrot pellets provide consistent nutrition.
-
Fresh vegetables (daily)
- Dark leafy greens (kale, collards, chard)
- Broccoli, bell peppers, carrots, squash, green beans
-
Some fruit (small portions)
- Berries, apple (no seeds), pear, kiwi, mango
-
Healthy extras
- Soaked or cooked whole grains (quinoa, brown rice, oats)
- Occasional nuts (walnuts, almonds, Brazil nuts) as high-value treats
Foods to avoid:
- Avocado
- Chocolate
- Caffeine (coffee, tea, soda)
- Alcohol
- Onions, leeks, garlic in large amounts
- High-fat, salty, or sugary human snacks
If it’s unhealthy for you, it’s probably worse for a 400-gram bird.
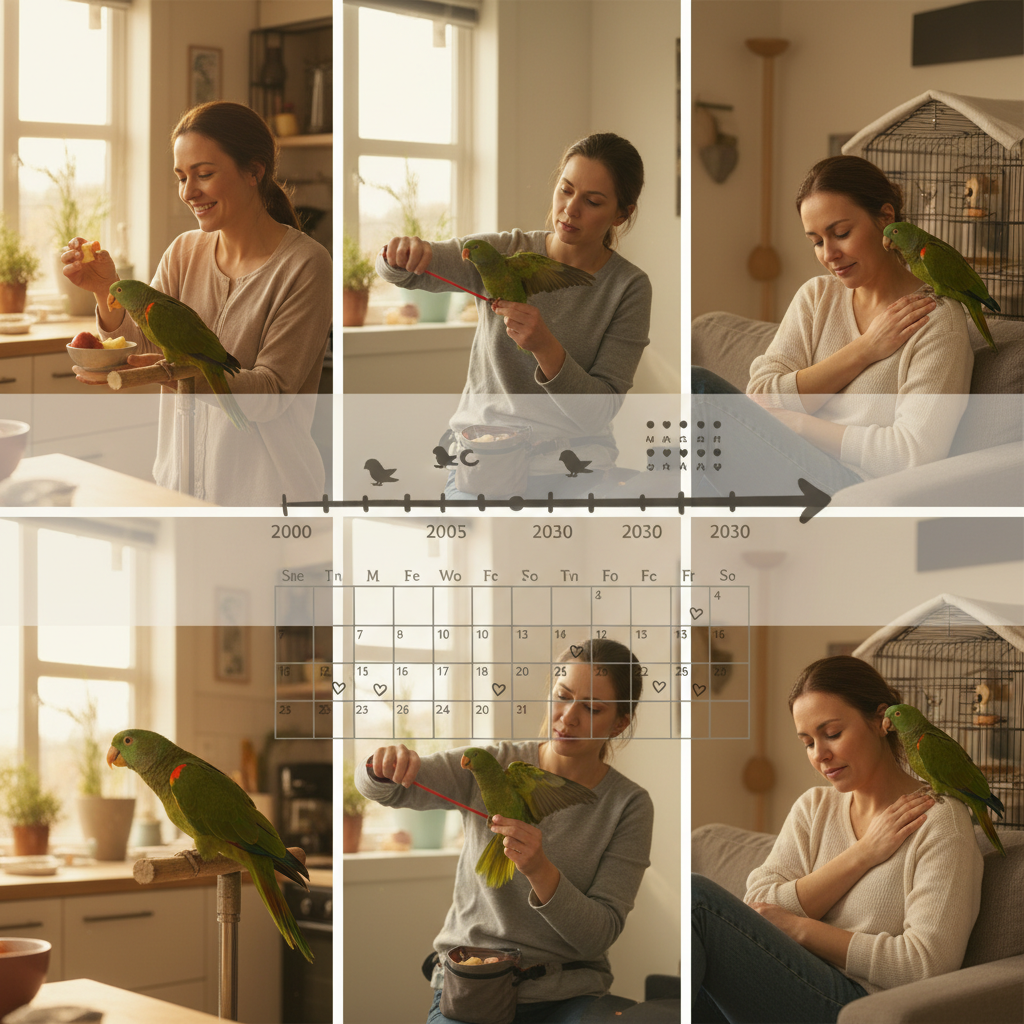
Training turns chaos into communication—and gives that smart Amazon brain something to do.
Behavior and Training: Living With a Turquoise Fronted Amazon
A bored Amazon is a loud, destructive, or nippy Amazon. Training and structure are your best friends.
Core training goals
-
Step-up and step-down
- Teach your bird to willingly step onto your hand or perch on cue.
- Use a calm voice and offer treats or praise.
-
Target training
- Use a stick or target to guide your bird’s movement.
- Great for exercise, building trust, and avoiding bites.
-
Recall and stationing
- Train your Amazon to come when called.
- Teach it to stay on a certain perch or play stand during specific times.
Managing hormones and mood
Turquoise Fronted Amazons, like many Amazons, can get more territorial or aggressive during breeding season.
Helpful strategies:
- Keep petting to the head and neck only to avoid overstimulation.
- Maintain a consistent sleep schedule (10–12 hours of darkness and quiet).
- Limit access to dark, nest‑like spaces (boxes, under furniture, inside closets).
Training isn’t optional; it’s how you both stay sane.
Health: Common Issues to Watch For
With good care, Turquoise Fronted Amazons can be robust, but they’re still vulnerable to:
- Obesity: From too many seeds, nuts, and little exercise.
- Fatty liver disease: Often linked to poor diet.
- Respiratory issues: From poor air quality, smoke, or aerosols.
- Psittacosis and other infections: Some can be zoonotic (transmissible to humans), so hygiene and regular vet care matter.
Warning signs that need an avian vet visit:
- Fluffed feathers for long periods
- Lethargy or unusual quietness
- Changes in droppings (color, consistency, volume)
- Labored breathing, tail bobbing, nasal discharge
- Sudden behavior changes or loss of appetite
Find an avian veterinarian before you need one. Regular wellness checks can catch problems early.
Not exactly “beginner level”: life with an Amazon is equal parts joy, noise, and education.
Are Turquoise Fronted Amazons Good for Beginners?
Hot take in 3…2…1… Usually, no.
They can be amazing companions, but they’re best suited for:
- People with previous parrot experience (or very dedicated learners)
- Households that can handle noise and mess
- Owners ready for long-term commitment, training, and daily interaction
They may not be ideal if:
- You live in an apartment with thin walls
- You’re away from home most of the day
- You want a low-maintenance pet
- You’re not ready for potential bites, screaming phases, or hormonal seasons
They’re wonderful, but they’re not plug‑and‑play pets.
Ethical Considerations: Adoption and Sourcing
Because Turquoise Fronted/Blue-fronted Amazons are long-lived and demanding, many end up in rescues or sanctuaries when owners can’t keep up.
Before buying from a breeder, strongly consider:
- Checking parrot rescues or adoption organizations
- Asking about the bird’s background, behavior, and medical history
- Being honest about your lifestyle and whether you can meet their needs
If you do choose a breeder:
- Look for reputable, ethical breeders who prioritize health, socialization, and closed-band, legally bred birds.
- Avoid any source that can’t provide clear information about origin and paperwork (where required by law).
The “right” Turquoise Fronted Amazon for you might already be waiting in a rescue.
Daily routine multiplied by decades: Amazons are a lifestyle, not a short-term project.
Daily Life With a Turquoise Fronted Amazon: What to Expect
Let’s put this into a typical day:
Morning
- Uncover cage, greet your bird (they’ll likely greet you louder)
- Fresh water, breakfast (pellets + veggies)
- A bit of training or interaction before you start your day
Afternoon (if you’re home) or Evening
- Out-of-cage time on a play stand or gym
- Foraging activities (hiding food in toys or paper cups)
- More training, talking, or singing sessions
Night
- Calm interaction, light dimmed
- Cover or move to a quiet sleep area for 10–12 hours
Multiply that by 40+ years, and you get the idea.
This is a lifestyle choice, not a quick hobby.
Should You Get a Turquoise Fronted Amazon?
Ask yourself:
- Can I handle loud vocalizations—potentially daily?
- Can I commit time every single day for interaction, cleaning, and training?
- Am I financially prepared for avian vet care, quality food, and new toys regularly?
- Do I have a plan for this bird if my life changes (moves, kids, job shifts)?
If the honest answer is yes, a Turquoise Fronted Amazon can be:
- Deeply affectionate
- Hilarious
- Incredibly engaging and rewarding
If you’re unsure, it might be better—for you and for the bird—to admire them at a rescue, aviary, or from owners who are already set up for the chaos.
The Turquoise Fronted Amazon is not for everyone—but for the right person, it’s a once‑in‑a‑lifetime feathered friend.