Category: Uncategorized

  • Amazon Assessment Answers: What Actually Matters


    Amazon Assessment Answers: What Actually Matters


    Amazon Assessment Answers: What Actually Matters

    If you searched “amazon assessment answers” hoping for a secret answer key… I have good news and bad news.

    Bad news: There is no legit master sheet of Amazon online assessment answers that will magically get you hired.

    Good news: You can absolutely prepare in a smart, targeted way so that the questions feel familiar, your answers are stronger, and your chances shoot way up.

    This post breaks down how the Amazon assessments really work, what Amazon is actually testing for, and how to respond in a way that matches what they want—without cheating or memorizing random screenshots from Reddit.


    Candidate calmly preparing for an Amazon online assessment at a laptop with floating question cards

    What Is the Amazon Online Assessment, Really?

    Amazon uses a set of online assessments (often called OA1, OA2, etc. for tech roles, and different names for non-tech) to screen huge numbers of candidates quickly.

    Depending on your role, you might see:

    • Work style assessment (personality / behavioral)
    • Work sample assessment (job-simulation tasks)
    • Coding & data structures problems (for software / technical roles)
    • Logical reasoning / numerical reasoning
    • Language or writing tasks (for content, operations, etc.)

    All of these are trying to answer one question:

    “Would this person do well working at Amazon, with Amazon’s problems and Amazon’s culture?”

    Once you understand that, “amazon assessment answers” stops meaning “what exact options do I click?” and starts meaning “how do I think like Amazon when I answer?”

    Takeaway
    You’re not being tested on whether you can guess HR’s favorite multiple choice. You’re being tested on judgment, problem-solving, and culture fit.

    Branching question bank graphic showing randomized and adaptive Amazon assessment questions

    Why You’ll Never Find a Real Answer Key (And Why That’s Okay)

    Let’s be blunt: if Amazon used the same fixed questions and answers, those questions would be fully leaked within days.

    So what do they do instead?

    • Huge question banks. You and a friend may get totally different scenarios.
    • Adaptive questions. Some assessments adjust what comes next based on earlier answers.
    • Scenario variations. Same core idea, different numbers, details, or characters.

    On top of that, Amazon cares a lot about integrity. Trying to cheat via leaked answers can get you flagged or banned from reapplying if they detect it.

    But you don’t need a key if you know the rules of the game.

    Takeaway
    Stop hunting for leaked answer screenshots. Start learning the patterns and principles Amazon rewards.

    Infographic of Amazon Leadership Principles around a candidate silhouette

    The Real “Amazon Assessment Answers”: Think Like the Leadership Principles

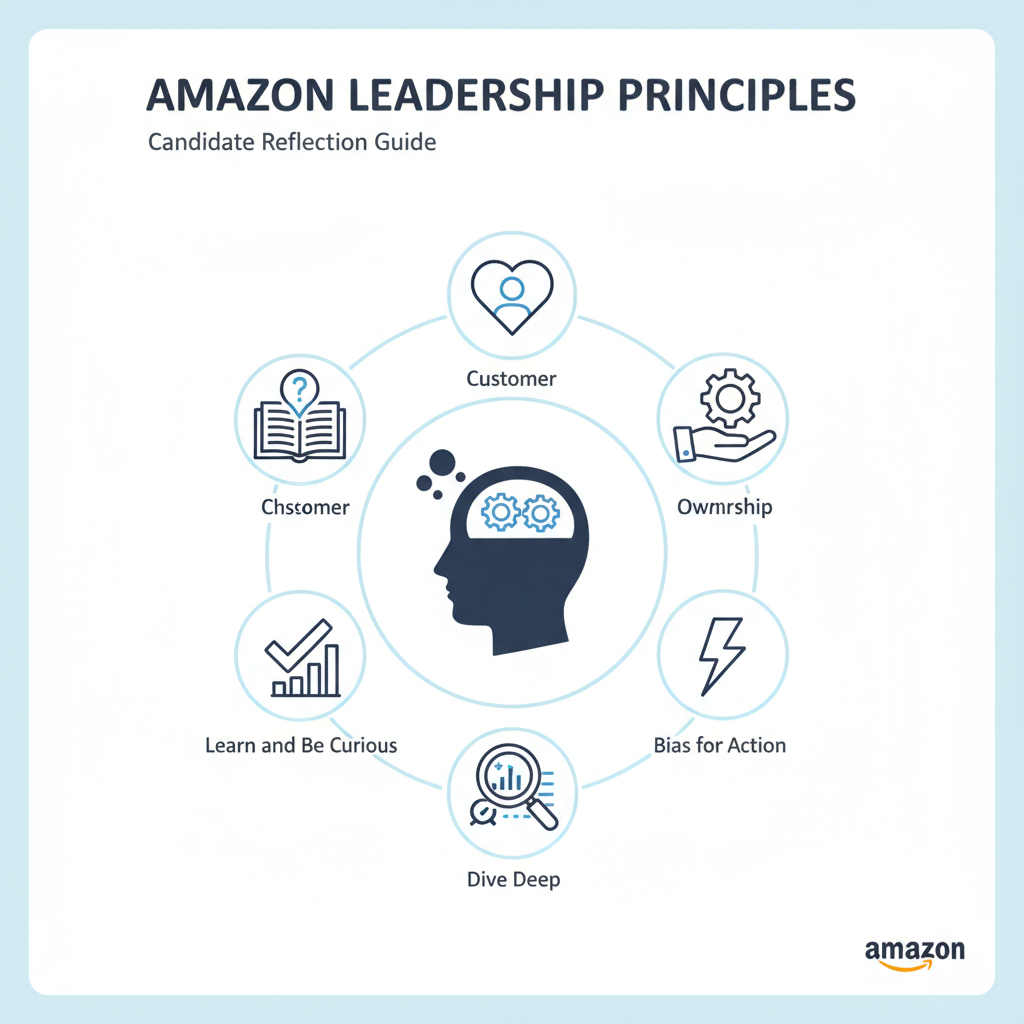
    If there is a “secret sauce,” it’s this: almost every behavioral and work-style question is secretly testing your alignment with Amazon’s Leadership Principles.

    Some of the big ones that frequently show up:

    • Customer Obsession – You prioritize the customer impact.
    • Ownership – You take responsibility, not just for your task, but for the outcome.
    • Bias for Action – You move with urgency and make decisions with incomplete info.
    • Dive Deep – You pay attention to details and data.
    • Learn and Be Curious – You seek to understand and improve.
    • Deliver Results – You actually get things done, not just talk about them.

    When you see a scenario like:

    “Your manager is out and a customer is angry. You have limited information and a deadline approaching. What do you do?”

    They’re not grading whether you pick Option A versus B based on vibes. They’re checking:

    • Do you obsess over fixing the customer problem?
    • Do you show ownership instead of saying “I’ll wait for my manager”?
    • Do you move, not stall—Bias for Action?
    • Do you try to get data or context—Dive Deep?
    Takeaway
    The best “amazon assessment answers” are the ones that scream: I think and act according to your Leadership Principles.

    Workplace dashboard scenario showing decision-making with customer impact and data

    How to Approach the Work Style Assessment (Personality Part)

    The work style assessments are those “What would you do?” or “Which statement sounds more like you?” questions. They often look like simple personality tests, but they’re more targeted.

    1. Be Consistent, Not Perfect

    Don’t answer as if you’re a flawless superhero. Instead, answer in a way that shows:

    • You’re customer-focused
    • You take ownership
    • You’re data-informed
    • You move quickly but aren’t reckless

    If in one question you say you always double-check data carefully, but in another you say you rarely review work before sending—those contradictions can hurt you.

    2. Don’t Over-Optimize for Niceness

    Amazon values being respectful, but many top-scoring answers:

    • Push for results
    • Challenge ideas when needed
    • Escalate issues if customer impact or safety is at risk

    Picking the most “polite” or “people-pleasing” option every time won’t necessarily score well.

    3. Extreme Answers Are Usually Wrong

    Questions like:

    “I always follow the process exactly as written, even if it slows things down.”

    Amazon culture is big on improvement, innovation, and Bias for Action. Blindly following process with no flexibility rarely matches their ideal. Look for answers that:

    • Respect process and
    • Focus on customer impact, data, and speed
    Takeaway
    Aim to be a data-driven, customer-obsessed owner who moves fast, learns, and improves—not a perfect robot or a people-pleasing chameleon.

    Amazon-style work simulation with metrics, emails, and prioritization bubbles

    How to Answer Scenario / Simulation Questions

    Many Amazon roles include job simulations:

    • You’re a manager dealing with conflicting priorities.
    • You’re in operations resolving shipment or inventory issues.
    • You’re in support, handling escalations and tricky customers.

    These often look like long emails, chats, or dashboards followed by multiple-choice decisions.

    Here’s a simple decision framework that tends to line up with strong Amazon-style answers:

    Step 1: Clarify the Customer Impact

    Ask yourself:

    • Who is the “customer” in this scenario?
    • What is the worst thing that happens to them if I do nothing?

    The higher the impact on the customer, the more urgent and serious your response should be.

    Step 2: Show Ownership, Not Deflection

    Good answers:

    • Take responsibility for moving the problem forward
    • Propose a path instead of waiting passively
    • Communicate clearly with stakeholders about what you’ll do next

    Weak answers:

    • Push the problem to someone else without adding value
    • Wait indefinitely for more info
    • Ignore or downplay clear issues

    Step 3: Use Data and Prioritization

    Amazon loves people who Dive Deep. So in scenario answers that mention metrics, SLAs, or dashboards:

    • Use numbers to justify your choice when possible
    • Prioritize tasks based on impact, deadlines, and customer effect

    Step 4: Balance Speed and Rigor

    In time-sensitive scenarios, strong answers:

    • Act quickly on the biggest known risks
    • But still check the most critical assumptions

    For example, you might:

    • Immediately stop a faulty process that harms customers
    • While you investigate root cause and prevent recurrence
    Takeaway
    In simulation questions, the “right” Amazon assessment answers usually protect the customer, show ownership, use data, move fast, and fix the root cause—not just the symptom.

    Coding assessment scene with engineer, code, algorithms, and countdown timer for Amazon OA prep

    What About Coding Assessments for Amazon (OA1/OA2)?

    If you’re applying for a software engineer or SDE internship role, you’ll likely see coding questions similar to what you’d find on LeetCode or HackerRank.

    Here’s how to “answer” these the right way:

    1. Expect Classic Data Structures & Algorithms

    You’ll often see problems involving:

    • Arrays, strings, hash maps
    • Trees, graphs, queues, stacks
    • Greedy algorithms, dynamic programming
    • Sorting, searching, and complexity tradeoffs

    You don’t need secret Amazon-specific tricks. You need:

    • Clean problem understanding
    • A correct and efficient approach
    • Working code that handles edge cases

    2. Practice With a Timer

    Most Amazon coding assessments are timed. To prep:

    • Solve 2–3 problems a day with a strict time limit
    • Practice writing from scratch in the language you’ll use (Java, Python, C++, etc.)
    • Focus on clarity: good variable names, helper functions, comments if needed

    3. Don’t Panic on Edge Cases

    Before you hit “submit,” quickly ask:

    • What if the input is empty?
    • What if it’s very large?
    • What if values repeat or are negative?

    Often, fixing one or two simple edge cases can move you from partial credit to a pass.

    Takeaway
    The best “answers” here are just good algorithm prep, solid coding habits, and calm testing under time pressure.

    Side-by-side weak vs strong answer visualization for a delayed shipment scenario

    Example: Turning a Weak Answer into a Strong Amazon Answer

    Let’s say the scenario is:

    A key shipment to a major customer is delayed due to an internal error. They’re upset and threatening to cancel future business. What do you do?

    Weak answer (what many people pick):

    • Apologize
    • Explain it wasn’t your fault
    • Offer a small discount
    • Promise to do better next time

    This sounds reasonable—but it’s light on Ownership, Dive Deep, and Deliver Results.

    Stronger Amazon-style answer:

    • Immediately acknowledge and apologize for the impact on the customer (Customer Obsession)
    • Take responsibility on behalf of the team, not blaming colleagues (Ownership)
    • Offer specific, meaningful options: expedited shipping, alternative inventory, or other compensation based on policy (Deliver Results)
    • Quickly investigate the root cause of the delay using system data/logs (Dive Deep)
    • Implement or propose a process fix to prevent recurrence and communicate back to the customer what changed (Learn and Be Curious)

    See the difference? The second answer doesn’t just soothe feelings; it fixes the problem and the system.

    Takeaway
    When in doubt, layer in multiple Leadership Principles into your decision.

    Conceptual warning infographic about gaming tests and leaked answer sheets

    Red Flags That Can Hurt Your Amazon Assessment Score

    Even strong candidates sometimes tank the assessment by doing these:

    1. Trying to “game” the test too hard
      Overthinking every option as “What do they want?” instead of “What would a strong, data-driven owner do?” can make your answers inconsistent.
    2. Being conflict-avoidant in every scenario
      If you never escalate, never challenge a bad decision, and always just go along—that doesn’t align well with Amazon’s culture of insisting on high standards.
    3. Ignoring data that’s clearly given
      If a question gives you metrics, trends, or SLAs, and you choose an answer that acts like those numbers don’t exist, that’s a bad sign.
    4. Blaming others or hiding mistakes
      Amazon heavily values Ownership and earning trust. Answers that dodge responsibility or shift blame usually score poorly.
    Takeaway
    Answer like a high-ownership, numbers-aware teammate who cares more about the customer and outcome than about avoiding hard conversations.

    Focused candidate preparing for Amazon assessment with leadership principles and scenarios

    How to Prepare for the Amazon Assessment (Without Cheating)

    Here’s a simple prep plan you can follow over a few days:

    Day 1–2: Learn the Culture

    • Read through Amazon’s Leadership Principles and rewrite each in your own words.
    • For each principle, think of one real story from your past that shows it (job, school, projects, volunteering).

    Day 3–4: Practice Scenarios

    • Look up example Amazon-style behavioral questions (search for Amazon behavioral questions leadership principles).
    • For each, ask: “Which principle is this testing?”
    • Practice choosing options that:
      • Protect customer impact
      • Show ownership
      • Use data
      • Deliver results

    Day 5–7: If It’s a Tech Role, Grind Problems

    • Use sites like LeetCode / HackerRank for 1–2 problems a day.
    • Focus on arrays, strings, hash maps, and sorting/searching.
    • Set a timer equal to typical OA time per problem.

    Right Before the Assessment

    • Check your environment: stable internet, quiet space
    • Read every question carefully (you can’t “undo” some answers)
    • Don’t rush, but don’t obsess over perfection either
    Takeaway
    You don’t need months of preparation. A focused week aligned to how Amazon actually evaluates can make a big difference.

    Calm, confident candidate treating the Amazon assessment as a preview of the job

    Final Word: The Best “Answer” Is Your Fit

    You can’t (and shouldn’t) brute-force your way into Amazon with a collection of leaked “amazon assessment answers.”

    What you can do is:

    • Understand what Amazon values
    • Practice thinking and deciding with those values in mind
    • Prep the skills (coding, analysis, communication) that the role requires

    Then, when you sit down for the assessment, the questions won’t feel like trick puzzles. They’ll feel like a preview of the job—and a chance to show you already think like someone who belongs there.

    If you’d like, tell me what role you’re applying for (SDE, operations, marketing, warehouse, etc.), and I can walk you through the most likely assessment format and how to tailor your preparation.


  • Amazon 401(k): How To Max It Out


    Amazon 401(k): How To Max It Out


    Amazon 401(k): How To Max It Out

    If you work at Amazon and you’re not taking full advantage of the 401(k), that’s basically leaving free money in your manager’s inbox.

    Let’s fix that.

    This guide breaks down how the Amazon 401(k) works, what’s changed recently, and how to actually use it like someone who likes Future You.

    Quick note: Amazon can and does update its benefits. Always double‑check the latest plan details in your Amazon Benefits portal or with Fidelity (Amazon’s 401(k) provider in the U.S.). This post gives you a clear framework so updates are easy to plug in.


    Amazon employee checking a 401(k) dashboard with a smiling Future You in the background

    Your Amazon 401(k) is basically a “Future You” funding machine—if you actually turn it on.

    What is the Amazon 401(k) in plain English?

    Your Amazon 401(k) is an employer‑sponsored retirement plan managed through Fidelity. You put in a percentage of your paycheck, Amazon adds its own contributions (subject to eligibility and limits), and the money is invested for the long term.

    Key pieces:

    • Pre‑tax or Roth contributions (and sometimes after‑tax, depending on plan options and role)
    • Amazon contributions (employer match and/or non‑elective contributions depending on program and eligibility)
    • A lineup of investment options (target‑date funds, index funds, etc.)
    • Tax advantages now, later, or both
    Takeaway: The Amazon 401(k) is a tax‑favored bucket where both you and Amazon can stash money for your retirement.


    Infographic showing 2025 401(k) contribution limits for Amazon employees

    Think of IRS limits as three buckets: your contributions, catch‑up if 50+, and the combined total cap.

    How much can you contribute to Amazon’s 401(k)?

    The IRS sets the annual 401(k) contribution limits, and your Amazon plan has to obey those.

    For 2025 (most recent IRS numbers available as of January 2026):

    • Employee contribution limit: $23,000
    • Age 50+ catch‑up: additional $7,500 (so $30,500 total employee contributions)
    • Overall limit (employee + employer): $69,000 (or $76,500 with catch‑up)

    These limits apply across all 401(k) plans you participate in during the year. If you changed jobs mid‑year, you need to make sure you don’t overcontribute.

    Takeaway: Aim to at least hit the level that earns the full Amazon employer contribution, then work your way up toward the IRS max if you can.


    Conceptual visualization of employee and Amazon 401(k) contributions flowing into a vault with a vesting schedule

    Two streams—yours and Amazon’s—flow into the same 401(k) vault, but Amazon’s usually unlocks over time.

    Amazon 401(k) match and employer contributions (conceptually)

    Amazon’s exact match formula and eligibility can vary by role, region, and employment status, and it has changed over the years. But here’s how the structure typically works so you can plug in your specifics from the benefits site.

    1. Employee contributions

    You choose a percentage of your eligible pay to contribute each paycheck. You’ll usually see options like:

    • Traditional 401(k): Pre‑tax, lowers your taxable income today. You’ll pay taxes when you withdraw in retirement.
    • Roth 401(k): After‑tax, no deduction now, but qualified withdrawals in retirement are tax‑free.

    You can split contributions between the two as long as the total stays under the IRS annual limit.

    2. Amazon contributions

    Amazon may:

    • Match a percentage of what you contribute (up to a cap), and/or
    • Provide non‑elective contributions (money they put in regardless of whether you contribute, depending on program and eligibility)

    The exact formula (e.g., “X% match on the first Y% of pay”) is in your Amazon Benefits documentation. The logic, though, is universal:

    • There’s a magic percentage of your pay that unlocks the full company contribution.
    • Contributing less than that = leaving money on the table.

    3. Vesting (when Amazon’s money becomes fully yours)

    Your own contributions are always 100% vested—you can’t lose them.

    Amazon’s contributions often have a vesting schedule, meaning you earn ownership over time (e.g., a percentage per year of service). If you leave before you’re fully vested, you may forfeit some of the employer money.

    Check in your plan details:

    • Vesting schedule: Is it immediate, graded (e.g., 20% per year), or cliff (e.g., 100% after 3 years)?
    • Hire date and service years: These determine your vested percentage.
    Takeaway: Know your company match formula and vesting schedule. Then, at minimum, contribute enough to capture all of Amazon’s free money.


    Split-screen illustration comparing Traditional vs Roth 401(k) tax treatment over time

    Traditional helps cut taxes now; Roth helps future you keep more of your withdrawals later.

    Traditional vs Roth in the Amazon 401(k): which should you pick?

    Let’s talk taxes (but in a way that doesn’t put you to sleep).

    Traditional 401(k>

    Traditional 401(k)

    • Contributions are pre‑tax.
    • They lower your taxable income now (good if you’re in a high bracket today).
    • Withdrawals in retirement are taxed as ordinary income.

    Roth 401(k)

    • Contributions are made after tax.
    • No tax break now, but qualified withdrawals in retirement are tax‑free.
    • Great if you expect your future tax rate to be equal or higher than today, or you’re early in your career at a relatively low income.

    A simple Amazon‑employee rule of thumb

    This is not personalized tax advice, but here’s a common approach:

    • Early‑career / lower tax bracket: Tilt more toward Roth 401(k).
    • Mid‑ to late‑career / higher tax bracket: Tilt more toward Traditional 401(k) to reduce taxes now.
    • Unsure? Split contributions (e.g., 50/50). That gives you tax diversification later.
    Takeaway: You don’t have to choose “Team Traditional” or “Team Roth” forever; you can adjust your mix as your income and tax situation change.


    Amazon employee reviewing salary, RSUs, bonus, and 401(k) contribution levels on a dashboard

    Your RSUs and base pay live in different lanes. Your 401(k) percentage is tied to eligible pay, not vesting stock.

    How Amazon 401(k) works with RSUs (stock) and other comp

    Amazon comp can include:

    • Base salary
    • RSUs (restricted stock units)
    • Bonuses (in some roles/levels)

    Your 401(k) contributions are usually based on eligible pay, which typically includes base salary and sometimes bonuses, but not the value of RSUs when they vest (those are taxed as income separately, but they don’t automatically flow into the 401(k)).

    A realistic scenario

    Example:

    • You make $150,000 base salary.
    • You also have RSUs that vest worth, say, $80,000 this year.
    • You decide to contribute 10% of your salary to the 401(k).

    You’re contributing: 10% of $150,000 = $15,000 (toward the $23,000 annual IRS limit). The RSU income you recognize when they vest does not automatically increase your 401(k) contributions.

    A lot of Amazon employees who get meaningful RSU income choose to:

    • Max out their 401(k) early in the year via paycheck percentage, and
    • Use vested RSUs (after paying taxes) to build additional brokerage investments or an emergency fund.
    Takeaway: Don’t assume rising RSUs will automatically boost your 401(k) savings. You still need to set and adjust your contribution rate.


    Investment options inside an Amazon 401(k) including target-date, index, and bond funds

    Picking investments can be simple: a single target‑date fund beats analysis paralysis every time.

    Investment options inside the Amazon 401(k)

    Your 401(k) doesn’t just sit in cash (unless you pick the cash option). It’s invested in funds you choose from the plan menu.

    Common options in the Amazon 401(k) lineup generally include:

    • Target‑date funds (TDFs):
      • You pick a fund closest to your expected retirement year (e.g., 2050).
      • The fund automatically adjusts from aggressive (more stocks) to conservative (more bonds) as you age.
      • Easiest “set it and mostly forget it” option.
    • Index funds:
      • Track broad markets like the S&P 500, total U.S. stock market, or international stocks.
      • Typically low‑cost and tax‑efficient.
    • Bond funds:
      • Provide stability and income.
      • Useful as you get closer to retirement or want lower volatility.
    • Other specialized funds:
      • May include sector funds, global funds, or stable value funds.

    A simple portfolio framework for Amazon employees

    Not investment advice, just a common pattern:

    • If you don’t want to think about it: Choose a single target‑date fund that matches your retirement year.
    • If you’re comfortable being hands‑on:
      • 80–100% in a U.S. and international stock index mix when younger
      • Gradually add bond index funds as you approach retirement or if volatility stresses you out.
    Takeaway: Fees and simplicity matter more than having a perfectly optimized portfolio. A low‑cost target‑date fund is better than analysis paralysis.


    Illustration of an Amazon employee leaving the company with 401(k) rollover options

    Leaving Amazon? Your 401(k) doesn’t quit with you—you get to choose where it lives next.

    Vesting, leaving Amazon, and what happens to your 401(k)

    Life happens. Maybe you’re moving, switching industries, or just deciding you’ve had enough of orange badges. What happens to the 401(k)?

    1. Your contributions

    • Always 100% yours, no matter when you leave.

    2. Amazon contributions

    • You keep the vested portion.
    • Any unvested employer contributions are forfeited when you leave.

    3. Your options when you leave

    Typically, you can:

    1. Leave it in the Amazon 401(k) (if your balance meets the plan’s minimum requirement).
    2. Roll it over to:
      • A new employer’s 401(k), or
      • An IRA (Traditional or Roth, depending on tax treatment).
    3. In some cases, cash out (usually a bad idea):
      • You’ll owe income tax.
      • If you’re under 59½, you’ll likely owe a 10% early withdrawal penalty on top.

    Most financially savvy Amazon alumni either leave the account where it is for a while or roll it over to consolidate everything into one place.

    Takeaway: When you leave Amazon, your 401(k) doesn’t disappear. Just don’t impulsively cash it out.


    Tiered savings illustration showing match, 10–15 percent saving, and maxing out the 401(k)

    Think in tiers: grab the match, push toward 10–15%, then chase the IRS max if your budget allows.

    How much should you put into your Amazon 401(k)?

    Let’s break this down into tiers.

    Tier 1: Don’t leave free money behind

    • Contribute at least enough to get the full Amazon match / employer contribution.
    • If you can only do that, it’s still huge. A 3–5% extra of salary every year can be six figures over a career.

    Tier 2: Aim for 10–15% of income

    Many financial planners suggest 10–15% of your gross income going toward retirement (including employer contributions).

    • If Amazon contributes, say, 3–4%, you might aim for 6–12% from your own paycheck.

    Tier 3: Max it out if you can

    If your income allows and other priorities (emergency fund, high‑interest debt) are handled, consider:

    • Maxing the IRS limit ($23,000 for 2025; more with catch‑up if 50+).
    • Then potentially investing additional savings in:
      • An HSA (if eligible), or
      • A taxable brokerage account.
    Takeaway: The most important step is hitting the full Amazon contribution. After that, work toward 10–15% of income, then the IRS max as your budget allows.


    Checklist illustration of a new Amazon employee setting up their 401(k) in about 30 minutes

    Give your 401(k) 30 focused minutes once, then let automation carry most of the weight.

    New Amazon employee? Here’s a 30‑minute setup checklist

    If you just joined and your head is spinning from onboarding, here’s the CliffsNotes version.

    Step 1: Log into Fidelity via Amazon Benefits

    • Find your 401(k) section.
    • Turn auto‑enrollment ON (or bump up the default percentage if you’re already auto‑enrolled).

    Step 2: Choose your contribution rate

    • Find out what percentage unlocks the full Amazon contribution.
    • Set your contribution at least to that.
    • If possible, round up another 1–2%—you’ll barely notice it after a couple of paychecks.

    Step 3: Pick Traditional vs Roth (or both)

    • Early career / lower bracket? Lean Roth.
    • Higher income / high bracket? Lean Traditional.
    • Indecisive? Split 50/50 and revisit in a year.

    Step 4: Select your investments

    • Easiest option: pick a target‑date fund closest to your planned retirement year.
    • More advanced: build a simple 2–3‑fund mix of U.S. stock index + international stock index + bond index.

    Step 5: Turn on automatic increases (if available)

    • Enable a 1% per year auto‑increase until you hit your target savings rate.
    • That way, your savings grows quietly in the background without you constantly revisiting it.
    Takeaway: In under an hour, you can set up a system that keeps building your retirement savings while you focus on everything else.


    Common 401(k) mistakes visual checklist for Amazon employees

    Avoid the usual traps: skipped match, idle cash, and too much AMZN in every corner of your life.

    Common mistakes Amazon employees make with their 401(k)

    A few patterns show up over and over:

    1. Not contributing enough to get the full Amazon employer contribution
      • This is the big one. Always at least hit the match.
    2. Letting everything sit in cash or the default fund without checking
      • Make sure your money is actually invested in a way that fits your age and risk tolerance.
    3. Overlapping risk with too much Amazon stock + RSUs
      • If your RSUs already give you big exposure to Amazon stock, it’s often wise to keep your 401(k) mostly in diversified funds, not more AMZN.
    4. Ignoring vesting schedules when planning to leave
      • If you’re close to a vesting milestone, know what’s at stake.
    5. Waiting years to start contributing
      • Starting at 4% today usually beats starting at 10% 10 years from now. Time in the market > timing the market.
    Takeaway: The bar for “doing pretty well” is lower than you think: diversify, get the full Amazon contribution, and start early.


    Future self relaxing on a beach, happily funded by a well-used Amazon 401(k)

    A few small decisions now can mean Future You is on a beach—not still checking Slack.

    Final thoughts: your Amazon 401(k) is a tool, not homework

    It’s easy to treat your 401(k) like yet another corporate portal you’ll “deal with later.” But later quietly turns into years—and those are years of lost compound growth and free employer money.

    If you do nothing else this week:

    1. Log into your Amazon 401(k) account.
    2. Confirm you’re contributing enough to get the full employer contribution.
    3. Make sure your investments match your age and risk comfort (a target‑date fund is perfectly fine).

    Do that, and you’re already ahead of a huge percentage of people.

    Future You—probably somewhere on a beach, not checking Slack—will be very, very grateful.


  • What Is Amazon Pay And How It Works


    What Is Amazon Pay And How It Works


    What Is Amazon Pay And How It Works

    If you’ve ever been halfway through an online checkout, reached for your wallet, and immediately lost the will to live… Amazon Pay is basically built for you.

    No new account. No new password. No digging for your card. Just “Use my Amazon account” and you’re done.

    But what is Amazon Pay exactly, and is it actually safe to use? Let’s break it down in plain English.


    Frustrated shopper at a long checkout form made simpler with an Amazon Pay style button

    The basics

    What is Amazon Pay?

    Amazon Pay is a digital payment service that lets you use the payment methods and shipping addresses stored in your Amazon account to pay on other websites, apps, and sometimes in-store.

    Think of it like this:

    Instead of typing your card details into every random online store, you click a button that says “Pay with Amazon,” sign in (or you’re already signed in), and Amazon handles the payment.

    You’re not loading money into Amazon Pay like a wallet. It’s just a faster, safer way to use the cards you already have on file with Amazon.

    Quick definition
    Amazon Pay = A checkout option that uses your existing Amazon account for payments on third‑party sites.

    Key idea: If you trust Amazon with your card info, Amazon Pay lets you extend that trust to other merchants—without handing your card details directly to every store.

    Infographic showing how Amazon Pay connects your Amazon account to third-party online stores

    Availability

    Where can you use Amazon Pay?

    You’ll usually see “Amazon Pay” or “Pay with Amazon” as a button on the checkout page of participating merchants.

    You might find it:

    • On online stores selling physical products (electronics, clothes, gifts, etc.)
    • On service-based sites (subscriptions, software, NGOs, donations)
    • In some mobile apps for payments or subscriptions

    If a site supports Amazon Pay, you’ll typically see the option:

    • On the cart page
    • Or on the final payment step alongside credit card, PayPal, Apple Pay, etc.

    No Amazon Pay button = no Amazon Pay on that site.

    Takeaway: You can’t use Amazon Pay everywhere, only with merchants who’ve integrated it—similar to how Apple Pay or PayPal works.

    Step-by-step visual of selecting Amazon Pay, signing in, choosing card and address, and getting confirmation

    Step-by-step

    How does Amazon Pay work (step by step)?

    Here’s what actually happens when you use Amazon Pay during checkout:

    1. You pick Amazon Pay at checkout
      On the merchant’s website, you click “Amazon Pay” instead of entering your card details manually.
    2. You sign in to your Amazon account
      If you’re already signed in on that browser, it might skip this step. Otherwise, you log in using your usual Amazon email and password.
    3. You choose your payment method and address
      You’ll see your saved cards (debit/credit) and shipping addresses from Amazon:

      • Select the card you want to use
      • Pick or confirm a shipping address (for physical goods)
    4. Amazon processes the payment
      Amazon Pay sends the payment to the merchant using your chosen card—but the merchant never sees your full card number.
    5. You get confirmation
      You’ll typically get:

      • An order confirmation from the merchant
      • A payment confirmation from Amazon Pay in your email or Amazon account

    Behind the scenes

    • The charge will appear on your card statement as something tied to the merchant, not Amazon (though you may see “Amazon Pay” mentioned in some contexts).
    • You can view your Amazon Pay transaction history in your Amazon account settings under Amazon Pay.
    Takeaway: Amazon Pay is basically a middleman: it uses your Amazon wallet (cards + addresses) to pay other businesses without you retyping info.

    Lifestyle illustration of different real-world use cases of Amazon Pay for gifts, subscriptions, and shared accounts

    Use cases

    What can you pay for with Amazon Pay?

    You can use Amazon Pay for things like:

    • Physical products: clothes, gadgets, home goods, gifts, etc.
    • Digital products: software, subscriptions, memberships
    • Services: bookings, online tools, SaaS plans (if the service supports Amazon Pay)
    • Donations: some charities and nonprofits accept donations via Amazon Pay

    You cannot use Amazon Pay for:

    • Buying items directly on Amazon.com (there you just use your normal Amazon checkout)
    • Sending money peer-to-peer (it’s not like Venmo or Zelle)
    • Most in‑store retail purchases (except specific partnered experiences)
    Takeaway: Think of Amazon Pay as an online checkout option, not a general-purpose money app.

    Security illustration of a protected credit card inside an Amazon-style shield with multiple shops around it

    Security

    Is Amazon Pay safe?

    Let’s be real: No one wants to give their card to every single small store on the internet. Amazon Pay is designed to reduce that risk.

    Here’s how it helps from a security perspective:

    1. Your card details stay with Amazon

    When you pay via Amazon Pay:

    • The merchant never sees your full card number.
    • Amazon handles the transaction and passes along a confirmation, not your raw card info.

    This reduces how many places your card data lives—and fewer places = lower risk.

    2. Amazon’s security stack

    You’re getting the same security infrastructure Amazon uses for its own orders, which typically includes:

    • Encryption for payment data
    • Fraud detection/monitoring
    • Secure authentication and alerts

    Is it bulletproof? No system is. But you’re likely better off using a well-established payment platform than typing card info into sketchy-looking forms.

    3. Buyer protection & dispute options

    You still have:

    • Your bank/credit card chargeback rights
    • Amazon’s own support for issues related to Amazon Pay transactions

    If something goes wrong (fraud, unauthorized charge, etc.), you can:

    • Contact the merchant
    • Reach out to Amazon Pay support
    • Dispute via your card issuer
    Takeaway: Amazon Pay doesn’t make the internet 100% safe, but it can make your payment information more centralized and protected versus spreading your card around everywhere.

    Comparison of checkout options like manual card entry, PayPal, Apple or Google Pay, and Amazon Pay

    Comparison

    Amazon Pay vs. credit card vs. PayPal vs. Apple Pay

    So where does Amazon Pay fit in among the usual suspects?

    Amazon Pay vs. just typing your card

    Typing card directly:

    • Pro: Works on almost every site.
    • Con: You repeatedly share your card with many companies; annoying and less private.

    Amazon Pay:

    • Pro: Faster checkout, fewer places storing your card details.
    • Con: Only available where merchants support it; you still need an Amazon account.

    Amazon Pay vs. PayPal

    Similarities:

    • Both act as intermediaries: merchants don’t see your full card details.
    • Both work on third-party websites.

    Differences (high level):

    • PayPal often works like a wallet (you can hold a balance, send money to friends, get paid as an individual).
    • Amazon Pay is more focused on online shopping and merchant payments, tied to your Amazon account; no peer-to-peer payments.

    If you already live in the Amazon ecosystem and don’t care about P2P transfers, Amazon Pay can be very convenient.

    Amazon Pay vs. Apple Pay / Google Pay

    • Apple Pay/Google Pay are often used on phones and in stores (tap-to-pay) plus some web checkouts.
    • Amazon Pay is primarily for web and app-based checkouts via your Amazon login.
    Takeaway: Amazon Pay’s advantage is simple: if your life already runs through Amazon, it gives you a one-click-ish checkout on other sites too.

    Three scenes showing last-minute gift purchase, subscription management, and shared household Amazon account checkout

    Real-world moments

    Example scenarios where Amazon Pay shines

    Scenario 1: The impulse gift purchase

    You’re on a small stationery website you’ve never heard of, buying a last‑minute birthday gift. At checkout, you see:

    • Enter card details
    • PayPal
    • Amazon Pay

    You choose Amazon Pay, log in, pick your usual Visa and default address, and you’re done in 20 seconds. No new account, no card entry, less anxiety about giving your card info to a random site.

    Why Amazon Pay helped: Speed + reduced exposure of card details.

    Scenario 2: Subscriptions and recurring payments

    Some subscription-based services let you pay using Amazon Pay, and then bill your selected card through Amazon going forward.

    The perk?

    • If you update your card in your Amazon account, it automatically applies to that subscription payment too (depending on how the merchant set it up).

    Why Amazon Pay helped: Centralized card management; you don’t have to update payment details individually on each site.

    Scenario 3: Using a shared household Amazon account

    Many families share one Amazon account that already has the correct shipping address and a shared card.

    If someone else in the household is checking out on a third-party site using Amazon Pay:

    • They can use the same familiar card + address without needing access to the physical card.

    (Just make sure everyone using that Amazon login is trusted—obviously.)

    Why Amazon Pay helped: Convenience for multi-user households.

    Clean step-by-step panels showing how a shopper starts using Amazon Pay in checkout

    Getting started

    How to start using Amazon Pay as a shopper

    If you already shop on Amazon, you’re basically ready. Still, here’s a quick setup checklist:

    1. Make sure your Amazon account is updated

      • Add or update your credit/debit cards.
      • Confirm your billing address and shipping addresses.
    2. Look for the Amazon Pay button when shopping

      • At checkout, choose Amazon Pay when it appears.
    3. Sign in and confirm details

      • Log in using your Amazon credentials.
      • Pick which card and address to use.
    4. Check email for confirmations

      • Keep an eye on order confirmations from both the merchant and Amazon Pay.

    You don’t need to install a special Amazon Pay app; it’s all built into the web or app checkout experience.

    Visual comparison highlighting pros and cons of Amazon Pay versus other payment methods

    Big picture

    Pros and cons of using Amazon Pay

    Let’s zoom out.

    Benefits of Amazon Pay (for you as a customer)

    • Faster checkout: No typing card numbers, expiration dates, or addresses.
    • Fewer accounts to manage: One Amazon account powers multiple checkouts.
    • Less data spread: Fewer websites holding your payment data.
    • Familiar interface: Same look/feel as Amazon’s regular checkout.

    Drawbacks and limitations

    • Not available everywhere: You’ll still run into sites that don’t offer Amazon Pay.
    • Requires Amazon account: If you’re avoiding Amazon altogether, this is obviously a no.
    • Ecosystem lock-in: The more you rely on Amazon for payments, the more “stuck” you might feel in their ecosystem.
    Takeaway: If you’re already happily using Amazon, Amazon Pay is more convenience than complication. If you’re trying to limit your Amazon footprint, it’s not for you.

    Infographic showing types of users who benefit from Amazon Pay versus those who might skip it

    Fit check

    Who should use Amazon Pay (and who shouldn’t)?

    Amazon Pay is great if:

    • You shop online frequently and hate entering card details.
    • You already trust Amazon with your payment data.
    • You want a simpler way to manage cards and addresses in one place.

    You might skip Amazon Pay if:

    • You’re intentionally minimizing how much you use Amazon.
    • You prefer other systems like PayPal because of their specific features (e.g., P2P payments).
    • You rarely shop online and don’t mind manual checkout forms.

    Clean modern illustration of a shopper happily using an Amazon-style one-click checkout button

    In one sentence

    So… what is Amazon Pay, really?

    Amazon Pay is a checkout shortcut that lets you use your Amazon account to pay on other websites—saving time and limiting how many businesses see your card details.

    If you already live inside the Amazon universe, turning on Amazon Pay when you see it at checkout is almost a no‑brainer: fewer passwords, fewer forms, fewer chances for card info to go wandering.

    Next time you’re ready to abandon a cart because the form is too long, look for that little Amazon Pay button. It might just save the sale—and your patience.


  • What Is An Amazon Digital Charge?


    What Is An Amazon Digital Charge?


    What Is An Amazon Digital Charge?

    Person reviewing bank statement with an Amazon Digital charge highlighted

    You’re scrolling through your bank statement, feeling responsible and very adult…

    Then you see it:

    “AMAZON DIGITAL” – $0.99
    Or $2.99. Or $9.99. And your brain goes: Did I just get hacked for the price of a snack?

    Let’s unpack what an Amazon Digital charge actually is, how to figure out where it came from, and what to do if it’s not legit.

    What Is an Amazon Digital Charge?

    Collage of Amazon digital products like streaming, ebooks, music and cloud icons

    In simple terms, an Amazon Digital charge is a line item on your bank or credit card statement for digital content or services you bought through Amazon.

    Instead of shipping you a physical box, Amazon delivered something digital, like:

    • A movie or TV show rental/purchase on Prime Video
    • A Kindle ebook or comic
    • A digital subscription (e.g., channels, apps, cloud storage)
    • An Audible audiobook or membership
    • In‑app or in‑game purchases made through Amazon on certain devices

    On your bank statement, these often show up as:

    • AMAZON DIGITAL
    • AMZN DIGITAL
    • AMAZON SUBSCRIPTION or similar wording

    Think of it as Amazon’s umbrella label for “you bought something that lives on a screen, not in a box.”

    Takeaway: If it says Amazon Digital, it’s almost always related to content, subscriptions, or services, not physical products.

    Common Types of Amazon Digital Charges (With Examples)

    Calendar and icons illustrating recurring Amazon subscriptions and digital purchases

    Here are the most common reasons you’ll see an Amazon Digital charge and what they usually look like in real life.

    1. Prime Video rentals and purchases

    You’re watching a show, see a new movie, and click “Rent for $3.99.” Two days later you’ve forgotten all about it, but your bank didn’t.

    Typical examples:

    • Movie rentals (usually $2.99–$6.99)
    • Full-season TV passes
    • Buying a movie to own digitally

    These are often connected to your main Amazon account and can show as Amazon Digital Video or Amazon Digital on your statement.

    Mini‑takeaway: If the amount looks like a movie rental price, check your Prime Video viewing history.

    2. Kindle ebooks, comics, and digital magazines

    Any Kindle book you buy—whether on a Kindle device or from the Amazon app—will show as an Amazon digital charge.

    That includes:

    • Kindle ebooks
    • Kindle Unlimited add‑ons (if you buy books outside of the subscription)
    • Single‑issue comics or graphic novels
    • Digital magazine or newspaper issues

    If you share your account with family, a mystery $1.99 or $9.99 charge might be someone quietly binge‑reading on your dime.

    Mini‑takeaway: Check your Digital Orders for Kindle purchases, especially if kids or partners use your account.

    3. Subscriptions and memberships (the sneaky recurring ones)

    This is where many people get surprised. Amazon runs or processes a ton of recurring digital subscriptions, including:

    • Amazon Prime membership (monthly or yearly)
    • Kindle Unlimited
    • Audible (membership and extra credits)
    • Amazon Music Unlimited or other music tiers
    • Amazon Kids+ (formerly FreeTime Unlimited)
    • Prime Video Channels (like Paramount+, Max, STARZ, MLB, etc.)
    • Some app or game subscriptions through Amazon on Fire tablets/Fire TV

    These can post as AMAZON DIGITAL instead of spelling out the full service name, especially on bank/credit card statements.

    Red flags to watch for:

    • Same day every month? Probably a subscription.
    • Amount never changes (e.g., $5.99, $9.99, $14.99)? Almost definitely a subscription.
    Mini‑takeaway: A repeating Amazon Digital charge = you’re subscribed to something, even if you forgot you were.

    4. In‑app or in‑game purchases (especially on Fire devices)

    If you (or your kid) use a Fire tablet, Fire TV, or apps tied to your Amazon account, some in‑app purchases are billed through Amazon.

    Examples:

    • Extra game coins or gems
    • Unlocking a premium version of an app
    • Buying add‑on content inside a kids’ game or streaming app

    These may bundle under a generic Amazon Digital description on your statement, which makes them easy to forget and hard to recognize.

    Mini‑takeaway: Mystery charges + kids + Fire tablet = check in‑app purchase history and parental controls ASAP.

    5. Cloud and storage services

    Less common, but still possible:

    • Amazon Drive / Amazon Photos paid storage plans (for older accounts)
    • Other niche Amazon digital services or add‑ons

    If you’ve ever upgraded storage for photos or files, those can also appear as digital charges.

    Mini‑takeaway: If you’re paying for extra storage somewhere, it might be quietly renewing through Amazon.

    How to See Exactly What an Amazon Digital Charge Is For

    Amazon account dashboard showing digital orders and subscriptions matched to a bank charge

    Good news: You don’t have to rely on your memory. Amazon actually lets you trace most digital charges pretty precisely.

    Here’s how to investigate.

    1. Start with Your Amazon Order History

    1. Go to Amazon.com and sign in.
    2. Hover over or click “Accounts & Lists.”
    3. Click “Your Orders.”
    4. Switch the filter (usually “Orders”) to “Digital Orders” or “Digital Content and Devices.”

    Here you’ll see ebooks, digital rentals, subscriptions, and more tied directly to your account.

    Pro tip: Match the date and amount of the bank charge to one of these digital orders.

    2. Check Your Subscriptions and Memberships

    If it’s recurring, it may not show like a regular order.

    On Amazon:

    1. Go to “Your Account.”
    2. Click “Memberships & Subscriptions” (or “Your Memberships & Subscriptions”).
    3. Review the list for anything with a monthly or yearly renewal.

    Things to look for:

    • Trial offers you forgot to cancel
    • Channel add‑ons for Prime Video
    • Separate subscriptions for Audible, Kindle Unlimited, Music, or Kids+.

    You can usually see:

    • Next billing date
    • Cost per cycle
    • Option to cancel or turn off auto‑renew

    3. Check Digital Content Sections Directly

    Depending on the type of charge, check:

    • Prime Video → Your purchases & rentals
    • Kindle → Your Content & Devices
    • Audible → Your account & billing

    If someone in your household uses your login on a TV, tablet, or e‑reader, you’ll see their activity here too.

    Mini‑takeaway: Between Digital Orders and Memberships & Subscriptions, you can usually identify 95%+ of Amazon Digital charges.

    What If You Don’t Recognize the Amazon Digital Charge?

    Parent monitoring a child using a tablet that can make in-app purchases linked to Amazon

    Sometimes you genuinely don’t remember buying anything—or you’re sure you didn’t.

    Before you panic, go through this quick checklist.

    1. Check for family members or shared devices

    Ask yourself:

    • Does your partner, roommate, or child know your Amazon password?
    • Is your account logged in on a Fire TV, smart TV, or tablet?
    • Is 1‑Click purchasing enabled?

    It’s very common for kids to click “Buy” or “Rent” without realizing it costs money—especially in games or streaming apps.

    What to do:

    • Review your device list in Accounts & Lists → Content & Devices → Devices and deregister anything you don’t know.
    • Turn on purchase restrictions or PIN protection for Prime Video and in‑app purchases.

    2. Make sure it’s not from another Amazon account you own

    You might have:

    • A separate business Amazon account
    • An old account tied to a different email
    • A child’s profile that’s still linked to your card

    Check other email addresses for Amazon receipts around the date of the charge.

    3. Compare exact amounts and dates

    Pull up your:

    • Bank/credit card statement (exact amount and posting date)
    • Amazon Digital Orders & Subscriptions history

    Look for an exact or close match. Some charges may authorize on one day and officially post the next, so give a 1–2 day window.

    If nothing lines up, move to the next step.

    4. Contact Amazon support

    If you still don’t recognize the charge:

    1. Go to Help on Amazon.
    2. Choose “Something else → Payments → Unknown charge.”
    3. Use chat or phone support to ask them to identify the charge.

    Have this ready:

    • Exact amount of the charge
    • Date it appeared on your statement
    • Last 4 digits of the card charged

    Amazon can usually see what product or subscription triggered the charge and on which account.

    Mini‑takeaway: If you truly didn’t authorize it, Amazon support is your next (and best) move.

    How to Stop Future Unwanted Amazon Digital Charges

    Dashboard and tools showing control over subscriptions, alerts, and purchase restrictions

    Once you’ve solved the mystery, you probably want to make sure it doesn’t happen again—especially if surprise subscriptions are part of the story.

    1. Cancel unused or surprise subscriptions

    In Memberships & Subscriptions:

    • Cancel anything you don’t actively use.
    • Downgrade if there’s a cheaper plan that fits you better.
    • Watch for free trials that auto‑renew.

    If you cancel right after being billed, Amazon sometimes offers:

    • A partial refund, or
    • Keeping access until the end of the billing cycle

    (Not guaranteed, but worth checking.)

    2. Lock down purchases on shared devices

    If kids or guests use your devices, set these up:

    • Prime Video PIN for purchases and rentals
    • Parental controls on Fire tablets and smart TVs
    • Turn off 1‑Click purchasing where you don’t need it
    • Set up separate profiles for kids with restricted access

    That way, nobody can accidentally rent five movies and buy three seasons of a cartoon at 6 a.m.

    3. Use alerts and virtual cards (optional but powerful)

    You can often:

    • Turn on transaction alerts in your banking app so every Amazon charge pings your phone.
    • Use a virtual card or a separate card just for subscriptions to track and control them more easily.

    This is overkill for some people—but very handy if you’ve been burned by surprise renewals before.

    Mini‑takeaway: A few 5‑minute tweaks now can save you from hours of detective work later.

    When an Amazon Digital Charge Might Be Fraud

    Comparison of suspicious Amazon Digital charges versus secure banking and 2FA setup

    Most of the time, Amazon Digital charges are legit but forgotten.

    It starts to look like fraud when:

    • You have no Amazon account tied to that card at all
    • You see multiple small charges in a short period you don’t recognize
    • Amazon support confirms the charge isn’t linked to your account

    In that case:

    1. Contact your bank or card issuer immediately.

      • Ask them to freeze or replace the card.
      • Dispute the unauthorized charge.
    2. Change your Amazon password if there’s any chance your account was accessed.
    3. Turn on two‑factor authentication (2FA) for extra security.
    Mini‑takeaway: One weird charge might be a forgotten rental. A pattern of weird charges? Time to involve your bank.

    Quick FAQ: Amazon Digital Charge Edition

    Quick FAQ overview about Amazon Digital charges and how to interpret them

    1. Why does my statement just say “Amazon Digital” and not what I bought?

    Because banks/card issuers often show only the merchant descriptor, not the specific item. Amazon groups digital content under a generic label, so you have to log into Amazon to see the details.

    2. Can Amazon refund an accidental digital purchase?

    Sometimes, yes—especially for things like accidental Prime Video rentals or ebook purchases, if you act quickly. You can often request a refund directly from the Order Details page for recently purchased digital items.

    3. Is Amazon Digital the same as Amazon Prime?

    Not exactly. Amazon Prime is one type of digital service. Prime charges may show as Amazon Digital on your statement, but so do many other things (ebooks, channels, music, etc.).

    4. How do I see all my Amazon digital subscriptions in one place?

    Go to Your Account → Memberships & Subscriptions. That’s your hub for recurring charges.

    The Bottom Line: Don’t Ignore Unknown Amazon Digital Charges

    Person feeling relieved after identifying their Amazon Digital charges

    If you see an Amazon Digital charge on your bank or credit card statement, it usually means you (or someone using your account):

    • Rented or bought digital content (movie, show, ebook, etc.)
    • Signed up for a subscription or free trial that renewed
    • Made an in‑app or in‑game purchase through Amazon

    Your action plan:

    1. Check Digital Orders and Memberships & Subscriptions in your Amazon account.
    2. Match the amount and date to a specific order or subscription.
    3. Cancel anything you don’t want going forward.
    4. Tighten up parental controls, PINs, and account security.
    5. If nothing matches, contact Amazon support—then your bank if needed.

    Once you know where to look, “Amazon Digital” goes from scary mystery charge to “oh… that audiobook I forgot I bought.”

    And hey, maybe this is your sign to finally do that subscription spring‑clean you’ve been avoiding.


  • What Are Amazon Digital Services, Really?


    What Are Amazon Digital Services, Really?


    What Are Amazon Digital Services, Really?

    Ever checked your bank statement, seen a charge from “Amazon Digital Svcs” and thought:

    “Did I just get hacked… or did I buy something weird at 2 a.m. again?”

    Let’s untangle that.

    In this post, you’ll learn what Amazon Digital Services actually are, what those mystery charges usually mean, how to see exactly what you’re paying for, and how to cancel anything you don’t want.


    Online bank statement showing an Amazon Digital Svcs charge next to a smartphone with Amazon and digital icons

    What Are Amazon Digital Services?

    Amazon Digital Services is basically Amazon’s umbrella label for products you don’t get in a box.

    Instead of physical stuff (like headphones or a toaster), these are digital products and subscriptions, such as:

    • Streaming video (Prime Video rentals, channels)
    • Digital books (Kindle eBooks, Audible credits)
    • Music (Amazon Music subscriptions)
    • Apps, games, and in-app purchases via Amazon
    • Cloud and software subscriptions (for some users)

    On your card or bank statement, these may show up as:

    • Amazon Digital Svcs
    • AMZN DIGITAL
    • Amazon Prime Video
    • Amazon Music

    So no, it’s usually not a hacker. It’s often past-you buying digital stuff that present-you forgot about.

    Quick takeaway: If it says Amazon Digital, think subscriptions, rentals, and downloads, not packages.

    Prime Video streaming interface on a TV with movie rows and channel subscriptions like Max and Paramount+

    Common Types of Amazon Digital Services (With Examples)

    Let’s break down the most common categories and what they actually look like in real life.

    1. Prime Video: Rentals, Purchases, and Channels

    Even if you have Amazon Prime, not everything on Prime Video is free.

    You can be charged for:

    • Movie rentals (e.g., you rent a new release for 48 hours)
    • Digital purchases (buying a movie or show permanently in your library)
    • Prime Video Channels (add-ons like Max, Paramount+, Starz, etc.)

    Real-world example:

    • You subscribe to the Paramount+ channel through Prime Video for a free trial.
    • You forget about it.
    • 7 or 30 days later: “Amazon Digital Svcs” charge hits your card for the monthly fee.
    Takeaway: If you see a monthly recurring Amazon Digital charge, a Prime Video channel subscription is a top suspect.

    2. Amazon Music (Free, Prime, and Unlimited)

    Amazon offers multiple music tiers:

    • Amazon Music Free – ad-supported, very limited.
    • Amazon Music Prime – included with a Prime membership (no extra charge beyond Prime itself).
    • Amazon Music Unlimited – a separate paid subscription with more features and a larger catalog.

    If you see a charge that looks like $9.99 / $10.99-ish per month from Amazon Digital, it could be:

    • A standalone Amazon Music Unlimited subscription.
    • A family plan or device-linked music subscription.

    Real-world example:

    You buy an Echo device. During setup, you tap through a prompt for a 3-month free trial of Music Unlimited. Three months go by, and suddenly: recurring “Amazon Digital” music charges.

    Takeaway: Music-related trials are quick to start and easy to forget. Always check the Music tab in your Amazon account if something looks off.

    3. Kindle eBooks and Kindle Unlimited

    If you ever bought:

    • A Kindle eBook
    • A digital comic or manga
    • A Kindle short read

    …it may be labeled as an Amazon Digital charge.

    Separate from one-time book purchases, there’s also Kindle Unlimited, a subscription that lets you read from a large catalog for a monthly fee.

    Real-world example:

    You subscribe to Kindle Unlimited for a free trial, thinking you’ll cancel once you’re done binging. Your future self does not, in fact, cancel.

    Your bank statement: recurring Amazon Digital Svcs every month.

    Takeaway: One-time eBooks are single charges. A repeating, same-amount charge each month may be Kindle Unlimited or another reading subscription.

    4. Audible (Sometimes Shows as Digital Services)

    Audible, Amazon’s audiobook service, sometimes appears directly as Audible on statements, but depending on your bank, it may show up along the lines of Amazon Digital or AMZN Digital.

    You might be paying for:

    • Audible Premium Plus: includes credits for audiobooks.
    • Audible Plus: streaming access to a catalog of audiobooks and podcasts.

    Real-world example:

    You signed up to get that “1 free audiobook” deal.

    Guess what: that was a trial that converts to a monthly subscription unless you cancel.

    Takeaway: If you listen to audiobooks and see a recurring Amazon Digital charge, open your Audible account and check your plan.

    5. Apps, Games, and In-App Purchases

    If you’ve used:

    • A Fire tablet
    • A Fire TV
    • The Amazon Appstore on Android

    …then some of your app purchases, game coins, subscriptions, or add-ons can show up as Amazon Digital Services.

    This is especially common if:

    • Kids use your device and click on in-app purchases.
    • You subscribe to services (like streaming apps or games) through Amazon instead of directly from the provider.

    Real-world example:

    Your kid plays a game on a Fire tablet and buys extra coins or bonus levels. You later see weird $0.99, $4.99, $9.99 charges from Amazon Digital.

    Takeaway: If you have kids or a shared device, check in-app purchases and consider turning on purchase restrictions.

    6. Cloud, Storage, and Other Niche Services

    Depending on how deep you are in the Amazon ecosystem, you might also see digital charges for things like:

    • Amazon Drive / Photos extra storage (legacy users)
    • Some software subscriptions processed through Amazon
    • Certain digital magazines or news subscriptions

    Most regular shoppers won’t see many of these, but if you’re techy or use Amazon for business tools, it’s possible.

    Takeaway: Not every Amazon Digital charge is entertainment-related; some may be tied to storage or software.

    Laptop showing Audible, apps and games, and cloud storage tabs to illustrate different Amazon digital services

    How to See Exactly What an Amazon Digital Charge Is

    Instead of guessing, you can match the charge to a specific order or subscription.

    Step 1: Check Your Digital Orders

    1. Go to Amazon.com and sign in.
    2. Hover over “Accounts & Lists” > click “Your Orders”.
    3. Switch the filter from “Orders” to “Digital Orders” or “Digital Content and Devices”.
    4. Look for items around the date and amount of the charge.

    You may see:

    • Movie rentals
    • eBooks
    • Game purchases
    • Channel subscriptions

    Step 2: Check Your Subscriptions & Memberships

    1. In your Amazon account, go to “Your Memberships & Subscriptions” (wording may vary slightly).
    2. Look for any active items under:
      • Prime Video Channels
      • Kindle Unlimited
      • Amazon Music Unlimited
      • Audible
      • App or game subscriptions via Amazon
    3. Note the next billing date and amount.

    Step 3: Check Prime Video, Music, and Audible Individually

    Some services have their own settings pages:

    • Prime Video: Manage channels and purchases in your Prime Video account.
    • Amazon Music: Go to settings > Your Subscription.
    • Audible: Check your Membership details.
    Takeaway: Between Digital Orders and Memberships & Subscriptions, you can usually match every Amazon Digital charge to a specific product.

    Amazon account UI illustration connecting statement charges to digital orders and subscriptions

    How to Cancel Amazon Digital Services You Don’t Want

    Once you find the culprit, canceling is pretty straightforward.

    To Cancel a Prime Video Channel

    1. Go to Prime Video.
    2. Open Settings > Channels (or “Manage Your Channels”).
    3. Find the channel.
    4. Click Cancel Channel.

    You’ll often keep access until the end of the current billing period.

    To Cancel Amazon Music Unlimited

    1. Go to Amazon Music.
    2. Open your account or subscription settings.
    3. Click Cancel Subscription and confirm.

    To Cancel Kindle Unlimited

    1. Log in to Amazon.
    2. Go to Your Memberships & Subscriptions or Manage Your Content and Devices.
    3. Find Kindle Unlimited.
    4. Select Cancel Membership.

    To Cancel Audible

    1. Sign in to Audible (desktop browser is easiest).
    2. Go to Account Details.
    3. Click Cancel Membership and follow the steps.

    To Stop In-App Purchases / Kid Surprises

    On Fire devices or accounts that kids use:

    • Turn on Parental Controls.
    • Require a PIN for purchases.
    • Disable 1-Click purchasing where possible.
    Takeaway: The cancel buttons are there—but they’re buried a bit. Once you know where to look, you can clean house in 5–10 minutes.

    Person enabling two-step verification and reviewing Amazon subscriptions to prevent fraud and surprise charges

    Is Amazon Digital Services a Scam or Fraud?

    Most of the time, no.

    Amazon Digital Services is just the billing label Amazon uses for many of its digital products and subscriptions.

    However, you should be cautious if:

    • You never use Amazon video, music, or books and suddenly see multiple digital charges.
    • The charges are from a country or currency that doesn’t match your account.
    • You find no matching orders or subscriptions in your account.

    In those cases:

    1. Change your Amazon password and enable two-step verification.
    2. Remove any saved cards you don’t recognize.
    3. Contact Amazon Customer Support and your bank to dispute unknown charges.
    Red flag rule of thumb: If you can’t match a charge to anything in your account history, treat it as suspicious and investigate.

    Advisory scene of a user reviewing subscriptions, enabling security, and setting reminders to avoid surprise Amazon charges

    How to Avoid Surprise Amazon Digital Charges in the Future

    A little setup now can save you from future “What is this?!” moments.

    1. Track and Review Subscriptions Monthly

    • Once a month, visit “Your Memberships & Subscriptions”.
    • Cancel what you’re not actively using.
    • Set a calendar reminder for the end of any free trial.

    2. Turn Off One-Click or Require Password/PIN

    Especially on devices kids or guests can access:

    • Require a PIN or password for purchases.
    • Turn off 1-Click ordering where you can.

    3. Avoid Stacking Too Many Trials

    It sounds fun in the moment: 7-day trial here, 30-day trial there.

    But when they all convert in the same month, it’s… less fun.

    Try to:

    • Only start trials when you have time to actually use them.
    • Cancel early if you already know you won’t keep them.

    4. Use a Virtual or Limited Card (Advanced Option)

    Some people use virtual cards or limited-amount cards just for subscriptions. If the card expires or limits out, the subscription can’t silently renew.

    Takeaway: Subscriptions love to renew quietly. A tiny bit of structure—reminders, PINs, and periodic cleanups—keeps your budget in charge, not your impulse clicks.

    Stylized dashboard of Amazon digital services including video, music, books, and apps to summarize invisible purchases

    Quick FAQ About Amazon Digital Services

    What is Amazon Digital Services on my bank statement?

    It’s a generic label for Amazon’s digital products and subscriptions: things like Prime Video rentals, channels, Kindle eBooks, Kindle Unlimited, Amazon Music, Audible, apps, games, and in-app purchases.

    How do I see what I was charged for?

    Check your Digital Orders and Memberships & Subscriptions in your Amazon account, and cross-reference the date and amount with your statement.

    Why am I being charged every month?

    You likely have an active subscription—for example Prime Video Channels, Amazon Music Unlimited, Kindle Unlimited, Audible, or a game/app subscription.

    How do I stop Amazon Digital Services charges?

    Find the corresponding subscription in your Amazon account and hit Cancel. If you can’t find it, contact Amazon Support and your bank.


    Calm digital library with cards for Audible, apps and games, and cloud storage summarizing Amazon digital services

    The Bottom Line: Amazon Digital Services = Your Invisible Purchases

    If Amazon’s cardboard boxes are the visible part of your spending, Amazon Digital Services are the invisible subscriptions and downloads quietly living in the background.

    Once you know where to look, those mystery charges stop being scary and start being manageable:

    • Identify the charge via Digital Orders and Subscriptions.
    • Decide if you still want it.
    • Cancel what you don’t.

    And maybe next time you accept a free trial at 1:37 a.m., set a reminder for future-you. They’ll appreciate it.


  • Amazon Software Engineer Salary Breakdown


    Amazon Software Engineer Salary Breakdown


    COMPENSATION • CAREER • BIG TECH

    Amazon Software Engineer Salary Breakdown

    If you’ve ever scrolled through Blind, Levels.fyi, or Reddit and thought, “Wait… Amazon is paying how much for software engineers?!”, you’re not alone. This breakdown walks through how pay is structured, what each level really looks like, and how not to leave stock (or cash) on the table.

    Software engineer reacting to Amazon compensation numbers on multiple monitors with charts

    Quick TL;DR: How Much Do Amazon Software Engineers Make?

    Amazon software engineer compensation is built from three main pieces:

    1. Base salary – Cash you get every paycheck (capped more tightly than some competitors).
    2. RSUs (Restricted Stock Units) – Amazon stock that vests over time.
    3. Sign-on bonuses – Cash paid in year 1 and year 2 to make up for the tilted stock vesting.

    Total compensation (“TC”) can range roughly like this in the U.S. (these are approximations, not guarantees, and vary a lot by location, performance, and market conditions):

    • SDE I (L4): ~ $150K–$250K total compensation
    • SDE II (L5): ~ $220K–$350K+ total compensation
    • Senior SDE (L6): ~ $320K–$550K+ total compensation
    • Principal/Staff+ (L7+): Often $550K–$1M+ depending on scope and timing

    Now let’s go deeper and explain why the numbers look like that, and how they’re structured.


    Infographic showing Amazon software engineer pay split into base salary, RSUs, and sign-on pillars

    How Amazon Software Engineer Salary Is Structured

    1. Base Salary

    Base salary is the easy part: this is your yearly cash.

    A few key points:

    • Amazon has a base salary cap (historically adjusted upward over time), so once you’re near the cap, the company leans harder on stock and sign-on to increase your overall pay.
    • Base varies heavily by location. A similar level in Seattle, NYC, or the Bay Area usually pays more than in lower-cost regions.
    • Base is the least volatile part of your pay—unlike stock, it doesn’t swing with Amazon’s share price.

    Takeaway: Base salary at Amazon is good but often not the star of the show. The real action is in equity and sign-ons.

    2. RSUs (Stock / Equity)

    Amazon grants you RSUs in AMZN stock, quoted as a fixed number of shares, not a dollar amount. At offer time, they’ll say something like: “We’re granting you 200 shares over 4 years.”

    Important details:

    • RSUs vest over 4 years with a back-loaded schedule. Historically something like:
      • Year 1: 5%
      • Year 2: 15%
      • Year 3: 40%
      • Year 4: 40%
    • This means your equity looks small in the first two years and ramps up significantly in years 3 and 4.
    • If Amazon’s stock price rises, your equity can be worth much more. If it falls, it can be worth less.

    Takeaway: RSUs are where a huge chunk of your long-term compensation lives, but they’re market-dependent and heavily back-loaded.

    3. Sign-On Bonuses (The Amazon Quirk)

    Because that 5/15/40/40 vesting schedule is so back-loaded, Amazon uses large sign-on bonuses to make your first two years competitive.

    Typical pattern:

    • Year 1 sign-on: Larger chunk (e.g., $60K–$200K depending on level and location).
    • Year 2 sign-on: Smaller, but still significant.

    These are usually paid out in installments (e.g., each paycheck), and they’re meant to “smooth” your pay while your RSUs are still ramping up.

    Gotcha: Sign-ons are temporary. Once they’re gone (after year 2), your compensation becomes much more dependent on stock and potential refreshers.

    Takeaway: Don’t just look at year-1 total comp. Look at what years 3 and 4 will actually feel like once sign-ons disappear.


    Visualization of Amazon RSU vesting with 5, 15, 40, and 40 percent bars made of stock icons

    Amazon Software Engineer Levels (L4–L7+) and What They Pay

    Amazon uses a level system that’s fairly consistent across engineering roles.

    Note: These ranges are ballpark and based on common U.S. tech hubs. High-cost metros (Seattle, Bay Area, NYC) skew higher; smaller markets may skew lower.

    L4 – Software Development Engineer I (SDE I)

    Who this is for: Early-career engineers—often with ~0–3 years of experience, or strong new grads.

    Typical package range (approximate):

    • Base salary: ~ $120K–$160K
    • RSUs: ~ $20K–$60K over 4 years (back-loaded)
    • Sign-on bonus: ~ $20K–$60K split across year 1 and year 2
    • Total comp: ~ $150K–$250K depending on location & timing

    What’s expected:

    • You can write solid production code.
    • You’re able to pick up Amazon tools, systems, and SDLC.
    • You need more guidance but can own small tasks end-to-end.

    L4 takeaway: Great starting point, but your biggest growth (skill + pay) will be getting promoted to L5.


    L5 – Software Development Engineer II (SDE II)

    Who this is for: Mid-level engineers, often with ~3–7 years of experience (though people may get there faster or slower).

    Typical package range (approximate):

    • Base salary: ~ $150K–$190K
    • RSUs: ~ $60K–$150K+ over 4 years
    • Sign-on bonus: ~ $40K–$120K across two years
    • Total comp: ~ $220K–$350K+ depending on team, geo, and stock price

    What’s expected:

    • You own significant features or services end-to-end.
    • You can break down ambiguous tasks and lead small projects.
    • You mentor junior engineers (L4) and set a solid technical bar.

    L5 takeaway: For many engineers, L5 is the “career stable point.” The pay is strong, the expectations are solid-but-manageable, and you’re no longer considered entry-level.


    L6 – Senior Software Development Engineer

    Who this is for: Strong senior ICs, often ~7–12+ years in, though tenure varies a lot.

    Typical package range (approximate):

    • Base salary: ~ $180K–$230K (often near the upper base cap)
    • RSUs: ~ $150K–$400K+ over 4 years
    • Sign-on bonus: ~ $80K–$250K+ across two years
    • Total comp: ~ $320K–$550K+, sometimes higher in hot orgs/locations

    What’s expected:

    • You own large, cross-team projects or critical services.
    • You’re a technical leader: design reviews, architecture decisions, mentoring.
    • You influence roadmaps, standards, and best practices.

    L6 takeaway: This is a big jump in both expectation and comp. You’re expected to lead at an org level, not just your own tasks.


    L7+ – Principal, Sr. Principal, Distinguished

    Above L6, things get more bespoke. Compensation can get very large, but so can scope and stress.

    Rough ideas:

    • Base salary: Typically near the internal cap.
    • RSUs: Often hundreds of thousands to millions in equity value over 4 years.
    • Sign-ons: Big, but highly individualized.
    • Total comp: Frequently $550K–$1M+, sometimes well above in certain roles.

    What’s expected:

    • You’re defining long-term technical direction for major orgs.
    • You operate across multiple teams, sometimes multiple orgs.
    • You’re a “force multiplier”—your work changes how many teams build and ship.

    L7+ takeaway: Great if you love large-scale impact and leadership; it’s not just “more coding for more money.” It’s politics, vision, and influence at scale.


    US map highlighting major Amazon tech hubs with brighter compensation bands

    How Location Affects Amazon Software Engineer Pay

    Comp at Amazon depends heavily on where you work and sometimes whether you’re remote.

    Broadly:

    • High-cost hubs (Seattle, Bay Area, NYC): Top of range for base, equity, and sign-ons.
    • Secondary hubs (Austin, Boston, Arlington, etc.): Competitive but sometimes 5–20% below the very top hubs.
    • Smaller markets / lower cost of living: Lower ranges, though sometimes still very strong relative to local market.

    If you’re comparing offers:

    • Always ask for numbers in writing, broken down by base, RSUs, sign-ons, and level.
    • Use tools like Levels.fyi and Blind to see geo-adjusted bands, but treat them as data points, not gospel.

    Takeaway: The same level at Amazon can have meaningfully different TC depending on where you sit.


    Timeline comparing years 1–2 sign-on heavy pay versus years 3–4 RSU-heavy pay

    How Promotions, Raises, and Stock Refreshers Work

    Let’s talk about what happens after you join.

    Annual Reviews

    • You’ll get performance reviews that can impact base salary increases, bonus multipliers, and RSU refreshers.
    • Strong performance can lead to larger stock refreshers, which are new grants that vest over time and help smooth your pay after the initial 4-year grant.

    Promotions

    • Promotions (e.g., L4 → L5, L5 → L6) usually trigger:
      • Higher base salary
      • New RSU grant sized for the new level
      • Sometimes additional sign-on or bonus components
    • The jump from L5 to L6 is especially meaningful in both expectations and pay.

    Takeaway: Long-term pay at Amazon depends a lot on stock refreshers, performance, and promotions—not just the original offer.


    Negotiation-focused illustration of engineer modeling 4-year compensation with sign-ons and RSUs

    How to Negotiate Your Amazon Software Engineer Offer

    Negotiating with Amazon is very normal. Recruiters expect it.

    Here’s a simple playbook:

    1. Get the Full Breakdown

    Before you even start negotiating, ask for this in writing:

    • Level (L4, L5, L6, etc.)
    • Base salary
    • Total RSUs and vesting schedule
    • Year 1 sign-on
    • Year 2 sign-on

    If you only know “total comp,” you cannot negotiate effectively.

    2. Benchmark with External Data

    Use:

    • Compensation sites (e.g., Levels.fyi-type data)
    • Chatting anonymously with peers (Blind, alumni groups, Discord communities)

    Look for same level + same city comparisons.

    3. Decide What to Push On

    At Amazon, you can often push on:

    • Sign-on bonus: Easiest lever to move in the short term.
    • RSUs: Some room for adjustment, especially at higher levels.
    • Level: Harder, but if you have competing offers at a higher level elsewhere, you can sometimes argue you’re being leveled too low.

    Base is somewhat constrained by internal caps, but there’s some room.

    4. Use Specific, Confident Language

    Example script:

    “Based on what I’m seeing for L5 in Seattle and competing offers I’m considering, I was expecting a total package in the $X–$Y range, with stronger equity and sign-on. Is there room to revisit the RSU grant and year-1 sign-on to get closer to that?”

    You don’t need a TED Talk. Just be clear, specific, and professional.

    Takeaway: One or two well-timed negotiation passes can be worth tens or hundreds of thousands over four years.


    Conceptual scene weighing Amazon software engineer pay against lifestyle and growth factors

    Is an Amazon Software Engineer Salary “Worth It”?

    So, should you chase an Amazon SDE role purely for the salary? Let’s balance the equation.

    Pros:

    • Highly competitive total compensation, especially at L5+.
    • Strong brand name that helps with future opportunities.
    • Exposure to large-scale systems and well-known engineering practices.

    Cons / Trade-offs:

    • Workload and pace can be intense depending on the team.
    • Compensation is heavily tied to stock performance, especially after sign-ons expire.
    • Career satisfaction varies a lot by manager, org, and product area.

    When evaluating:

    • Run a 4-year view: What does each year’s comp look like, including the drop-off after sign-on and the ramp-up of equity vesting?
    • Consider non-comp factors: team culture, product interest, work-life balance, growth opportunities.

    Takeaway: The money can be excellent, especially mid- and senior-level, but you should still optimize for team, manager, and growth, not just the biggest TC number on paper.


    Final summary illustration of an engineer mapping levels, pay, and a 4-year compensation plan

    Final Thoughts: How to Use This Info

    If you’re considering an Amazon software engineer role:

    1. Figure out your likely level (L4, L5, L6) based on your experience and scope.
    2. Research typical ranges for that level in your target city.
    3. Model a 4-year payoff, including sign-ons, vesting schedule, and some stock price scenarios.
    4. Negotiate once or twice—calmly, with data.
    5. Choose the option that balances compensation, learning, and lifestyle.

    You don’t need to game the system perfectly—you just need to avoid being wildly under-leveled or underpaid compared to your peers.

    And if all else fails, remember: offers can be renegotiated down the line with promotions and refresh grants. Your career is a marathon, not a one-shot negotiation.


  • Can You Use a Vanilla Gift Card on Amazon?


    Can You Use a Vanilla Gift Card on Amazon?


    Can You Use a Vanilla Gift Card on Amazon?

    Person holding a Vanilla Visa gift card while viewing the Amazon website on a laptop

    Wondering if that Vanilla Visa in your hand will actually work on Amazon? Yes—here’s exactly how.

    You’ve got a Vanilla Visa gift card burning a hole in your wallet, and Amazon is calling your name.

    But then the panic hits:

    “Wait… can I actually use a Vanilla gift card on Amazon, or is this going to error out 17 times and ruin my day?”

    Let’s walk through exactly how it works, what Amazon doesn’t tell you up front, and how to avoid the classic “payment declined” drama.


    Different types of Vanilla-branded cards arranged on a desk next to a check balance notepad

    First things first: understand what kind of Vanilla card you’re holding before you try to use it on Amazon.

    Quick Answer: Yes, You Can Use a Vanilla Gift Card on Amazon (With a Catch)

    Yes — you can usually use a Vanilla Visa, Mastercard, or Discover gift card on Amazon, but not as a “gift card” balance like an Amazon gift card.

    Instead, you have to treat it like what it actually is: a prepaid debit/credit card.

    In plain English:

    • You add it as a new payment method (like a normal credit/debit card).
    • Or you use it to buy an Amazon eGift Card and then load that to your Amazon balance.

    Both work. One is just a lot less fussy.

    FAST TAKEAWAY:

    • Vanilla gift card = prepaid card, not an Amazon-style gift code.
    • Use it at checkout or to buy an Amazon eGift Card and then spend that balance like normal.

    Close-up of Vanilla Visa and OneVanilla prepaid cards with visible logos and details

    Check the logo—if it’s Visa, Mastercard, or Discover, Amazon will usually treat it like any other card.

    Step 1: Figure Out What Type of Vanilla Gift Card You Have

    Not all “Vanilla” cards are identical, but most fall into these buckets:

    1. Vanilla Visa Gift Card
    2. OneVanilla Prepaid Visa or Mastercard
    3. Vanilla Discover or Mastercard Gift Cards

    If your card has a Visa, Mastercard, or Discover logo, Amazon will generally treat it like any other credit/debit card.

    Flip the card over and make sure you can see:

    • A card network logo (Visa/Mastercard/Discover)
    • A toll-free number or website to check balance
    • The card number, expiration date, and security code (CVV)

    If you don’t see those things, it might be a store-only or restricted card, which usually won’t work on Amazon.

    Takeaway: If it looks and acts like a Visa/Mastercard/Discover card, Amazon can almost always take it.

    Over-the-shoulder view of adding a Vanilla card as a payment method on Amazon

    Adding your Vanilla card to Amazon’s payment methods is simple—until the total is higher than your balance.

    Option 1: Add Your Vanilla Gift Card as a Payment Method on Amazon

    This is the most straightforward method… but also the one where small mistakes cause declines.

    How to add a Vanilla gift card on Amazon

    1. Check your card balance first
      Go to the website or phone number on the back of the card and confirm your exact remaining balance down to the cent.

    2. Go to your Amazon payment settings

      • Log in to your Amazon account.
      • Go to Accounts & Lists → Your Payments.
      • Click Add a payment method → Add a credit or debit card.
    3. Enter the Vanilla card info

      • Name on card: you can usually enter your own name. If it’s a generic gift card with no name, many people use their own first and last name.
      • Card number
      • Expiration date
      • CVV (security code)
    4. Use it at checkout (with a big warning)
      If your purchase total is more than the balance on the Vanilla card, Amazon will decline it. They don’t do automatic “split payments” between two cards.

      That means:

      • You must:
        • Either place an order that’s less than or equal to the card’s balance, or
        • Use the card to buy an Amazon eGift card first (more on that next).

    Why this often fails:

    • People try to buy $40 of stuff with a $25 Vanilla card.
    • Amazon can’t partially charge the Vanilla card and then the rest on your normal card in one step.
    • Result: declined, even though money is on the card.

    Takeaway: Use this method only if your entire order can be covered by the Vanilla card balance.

    Infographic showing Vanilla card being converted into an Amazon eGift Card and then account balance

    The smoothest route: convert your Vanilla balance into an Amazon eGift Card, then let Amazon handle the rest.

    Option 2 (Recommended): Use Your Vanilla Card to Buy an Amazon eGift Card

    This is the cleanest way to use every last cent on a Vanilla gift card without guesswork.

    Why this works better

    • Amazon can do split payments between an Amazon gift balance and a card, but not easily between two cards.
    • Once you convert your Vanilla balance into an Amazon gift card balance, you can mix it with any other payment method effortlessly.

    Step-by-step: Turn Vanilla → Amazon balance

    1. Check the exact balance on your Vanilla card
      Let’s say it’s $23.17.

    2. Go to Amazon’s eGift Card page

      • Search for “Amazon eGift Card” on Amazon.
      • Choose the Email delivery option.
      • In the “Amount” field, type the exact remaining balance (e.g., $23.17).
    3. At checkout, pay with your Vanilla gift card

      • Choose Add a credit or debit card.
      • Enter the Vanilla card info.
      • Make sure the order total matches or is slightly less than the balance on the Vanilla card.
    4. Redeem the eGift card to your account

      • The eGift card arrives by email (usually within minutes).
      • Click Apply to Your Amazon Account or copy-paste the claim code into Gift Cards → Redeem a Gift Card.

    Now your money is safely sitting as Amazon gift card balance.

    Next time you check out:

    • Amazon automatically uses your gift card balance first.
    • If your purchase costs more, it’ll charge the rest to your saved debit/credit card.

    Takeaway: This method almost always works and lets you use 100% of that random $7.42 left on the card.

    User seeing a payment declined message on Amazon with sticky notes of troubleshooting tips

    Hit a “Payment declined” wall? It’s usually a balance, hold, or billing-detail issue—not that your card is cursed.

    Common Problems People Hit (And How to Fix Them)

    1. “Payment declined” even though the card has money

    This usually happens because:

    • Your order total > card balance, and Amazon won’t partially charge the card.
    • There’s a temporary hold on the card (some cards place a pre-authorization when you check the balance or try a transaction).
    • The amount is too close to the balance (for example, the card has $25.00 but there’s a small tax or authorization that pushes the total beyond that).

    Fix:

    • Check the exact balance again.
    • Try purchasing an eGift card for a few cents less than the balance.
    • Or make a smaller purchase than the full balance.

    2. “Invalid card info” or “We couldn’t verify this card”

    Double-check:

    • Card number, expiration date, and CVV.
    • Zip code or billing address, if requested.

    Some Vanilla/OneVanilla cards allow you to register a billing address online. If Amazon asks for a billing address, use the same one you registered with the card site.

    If your card isn’t registered to any address, use the address recommended by the issuer (often your real mailing address).

    Fix:

    • Go to the card issuer’s website (on back of card) and register your card if that’s an option.
    • Re-enter the information on Amazon after registration.

    3. You have a weird leftover amount ($1.09, $2.63, etc.)

    This is where the eGift card trick shines.

    Try this:

    1. Check your exact remaining balance.
    2. Go to Amazon’s eGift Card page.
    3. Manually enter that exact amount.
    4. Pay with the Vanilla card.

    If it still fails, lower the amount by a few cents (for example, card shows $2.63 → try $2.50).

    Takeaway: That last couple of dollars doesn’t have to die in plastic purgatory.

    Multiple Vanilla cards next to an Amazon account showing a combined gift card balance

    Three half-empty cards? Turn each into an eGift Card and enjoy one clean Amazon balance.

    Can You Use Multiple Vanilla Gift Cards on One Amazon Order?

    Not directly.

    Amazon doesn’t allow you to:

    • Load multiple different prepaid cards in one purchase and have them each cover part of the total.

    But you can work around this:

    1. Convert each Vanilla card into a separate Amazon eGift card, one at a time.
    2. Redeem those eGift cards into your Amazon gift balance.
    3. Now your full combined balance can be used on any future order.

    Example:

    • Card 1: $15.62 → buy a $15.62 Amazon eGift card.
    • Card 2: $25.00 → buy a $25.00 Amazon eGift card.
    • Redeem both.
    • You now have $40.62 in your Amazon balance, usable in one order.

    Takeaway: Directly? No. Indirectly via gift balance? Absolutely yes.

    Vanilla card and Amazon screen with fine-print style notes about potential fees

    Vanilla cards can have fees in the background—move that money into your Amazon balance before they nibble it away.

    Are There Any Fees or Gotchas With Vanilla Gift Cards on Amazon?

    A few things to keep in mind:

    • No extra Amazon fee to use the card itself.
    • Some Vanilla cards may charge:
      • A purchase fee when the card is first bought.
      • Inactivity fees if the card sits unused for a long time (varies by issuer and state).
    • Once you convert to Amazon gift balance, there are no extra fees from Amazon, and the balance generally does not expire under current policies.

    Always check the card’s terms and conditions, especially if it’s been sitting in a drawer for a couple of years.

    Takeaway: Use it sooner rather than later so fees (if any) don’t quietly nibble away your balance.

    Happy scene showing converted Vanilla balances as a single Amazon gift card balance

    Once everything’s converted, Amazon just pulls from your balance first—no declines, no mental math.

    Real-Life Scenarios (And What You Should Do)

    Scenario 1: “I have a $50 Vanilla Visa and want to buy a $48 item.”

    You can:

    • Add the Vanilla card as a payment method and check out directly.
      (Order total is less than balance — you’re good.)
    • Or: use it to buy a $50 Amazon eGift card, load it to your balance, and use that for this or future orders.

    Scenario 2: “I have $20 left on my Vanilla card and a $60 Amazon cart.”

    In this case:

    • If you try to pay the $60 cart directly with the $20 Vanilla card, it will likely be declined.
    • Better: buy a $20 Amazon eGift card with the Vanilla card, apply it to your balance, then:
      • $20 comes from your Amazon balance, and
      • $40 from your regular debit/credit card.

    Scenario 3: “I have three almost-empty Vanilla cards with random amounts.”

    Strategy:

    1. Check each card’s balance.
    2. For each one, buy an Amazon eGift card for that exact (or slightly lower) amount.
    3. Redeem all eGift codes to your Amazon account.
    4. Enjoy one nice, clean balance instead of three tiny plastic headaches.

    TL;DR: Best Way to Use a Vanilla Gift Card on Amazon

    If you remember nothing else, remember this:

    • Yes, you can use a Vanilla Visa/Mastercard/Discover gift card on Amazon.
    • Treat it like a credit/debit card, not like an Amazon gift code.

    For fewer errors and maximum use of the balance:

    1. Check the card’s exact balance.
    2. Use it to buy an Amazon eGift card for that amount.
    3. Redeem the eGift card to your Amazon account.
    4. Let Amazon gift balance + your normal card handle future orders.

    Do that, and you’ll turn that random plastic gift into actual stuff at your door — no declined payments, no leftover pennies, no drama.


  • How To Share Your Amazon Profile Link


    How To Share Your Amazon Profile Link


    How To Share Your Amazon Profile Link

    Illustration of a person at a laptop looking for their Amazon profile link, with reviews and wishlists icons around the screen

    You’ve left a thoughtful review, built a cute little public wishlist, and maybe even answered a few product questions… but when someone says, “Send me your Amazon profile link,” your brain just goes: 👀

    Where is that thing?

    Let’s fix that in the next five minutes.

    In this guide, you’ll learn exactly what an Amazon profile link is, how to find it on desktop and mobile, how to customize parts of it, and how to share (or hide) what people see when they click it.


    Section 1

    What Is an Amazon Profile Link?

    Infographic-style view of Amazon desktop page showing where to access profile, reviews, and wishlists

    Your Amazon profile link is a unique URL that leads to your public Amazon profile page.

    Depending on what you’ve made public, that page can show things like:

    • Your public name (not necessarily your legal name)
    • Your profile photo (if you added one)
    • Your public reviews
    • Public wishlists or registries
    • Public questions you’ve asked or answered

    Think of it as your Amazon identity page – similar to a social profile, but centered around your shopping and reviewing activity.

    You can share this link when:

    • A brand asks for your reviewer profile
    • You want to show off your wish list to friends and family
    • You’re doing UGC (user-generated content), affiliate content, or product reviews and need proof of activity
    • You’re collaborating in a community or group buy and people want to see your review history
    Key takeaway: Your Amazon profile link is your public-facing hub on Amazon. The URL is unique to you, and you control what others can see by changing your profile and privacy settings.
    Section 2

    How To Find Your Amazon Profile Link on Desktop

    Desktop walkthrough showing the path Account & Lists to Your Account to Profile and copying the Amazon profile URL

    Let’s start with the browser/desktop version of Amazon.

    Step-by-step (Web Browser)

    1. Go to Amazon and sign in
      Open amazon.com and make sure you’re logged into the correct account.
    2. Open Your Account page
      Hover over “Account & Lists” in the top-right corner, then click “Account” from the dropdown.
    3. Find Your Profile
      • Look for a section like “Ordering and shopping preferences” or “Personalization”.
      • Click on “Profile” or sometimes “Your Amazon profile”.
      • (On many accounts, you can also go directly via: Accounts & Lists → Your Account → Profile.)
    4. Copy the URL from the address bar
      Once your profile loads, you’ll see a URL in your browser that looks something like:

      • https://www.amazon.com/gp/profile/amzn1.account.ABCDEFGHIJKL
      • or
      • https://www.amazon.com/profile/your-public-name-here
    5. That entire URL is your Amazon profile link
      Highlight it, copy it, and paste it wherever you need.

    Optional shortcut:
    If you’re already logged in, you can often visit https://www.amazon.com/profile and it will redirect you to your profile URL. Once it loads, just copy the URL in the address bar.

    Desktop takeaway: Navigate to Account → Profile, then copy the profile URL from the browser’s address bar. That’s your Amazon profile link.
    Section 3

    How To Find Your Amazon Profile Link on Mobile (App)

    Side-by-side iPhone and Android mockups showing how to tap through the Amazon app to profile and share the link

    Finding your Amazon profile link in the app is a bit less obvious. Amazon likes to hide things three taps deep.

    iOS & Android (Amazon App)

    1. Open the Amazon app and log in.
    2. Tap the menu icon (three horizontal lines ☰)
      Usually in the bottom bar or top-left/right, depending on your version of the app.
    3. Go to “Your Account.”
    4. Look for something like “Profile”, “Your Profile”, or occasionally under a section like “Personalized content” or “Profile & community.”
    5. Open your profile.
      You’ll now see your public profile page with your name, reviews, etc.
    6. Share the link.
      • Some versions of the app have a Share icon (an arrow or three connected dots). Tap that to copy or share your profile link.
      • If there’s no Share button, tap the three dots (⋯) on your profile page and see if there’s an option like “Share profile” or “Copy link.”

    If the app doesn’t easily give you the URL, use this simple workaround: open Amazon in your mobile browser instead of the app, go to your profile as described in the desktop steps, and copy the link from the browser address bar.

    Mobile takeaway: Find Your Account → Profile in the app, then use the Share/Copy option; if that fails, open Amazon in a browser and copy the URL there.
    Section 4

    How To Customize What Shows on Your Amazon Profile

    Amazon-style profile editing screen with fields for public name, photo, and privacy toggles for reviews and wishlists

    Sharing your Amazon profile link is one thing. Sharing your entire life story of impulse buys? Maybe not the vibe.

    Before you send that link around, you’ll probably want to tweak your public info and privacy settings.

    Change Your Public Name

    Your public profile name is what people see when they view your profile or your reviews. It does not have to be your real name.

    On Desktop:

    1. Go to Account & Lists → Account → Profile.
    2. On your profile page, look for an “Edit your profile” or “Edit profile” button.
    3. You can typically change:
      • Public name
      • Bio (if available)
      • Profile picture
    4. Save your changes.

    On Mobile:

    1. Go to your profile in the app.
    2. Look for Edit profile or a pencil icon.
    3. Change your public name and other visible details, then save.

    Adjust What Activity Is Public

    Inside the same Edit profile or Profile settings section, you may see options to control things like:

    • Whether your reviews are public
    • Whether your wish lists or shopping lists are public
    • Whether registries (wedding, baby, etc.) are visible

    You can:

    • Turn some items private
    • Change a list from “Public” to “Private” or “Shared”

    This way, someone clicking your Amazon profile link sees only what you actually want shared.

    Privacy takeaway: Your profile link is public, but you control what appears on that page via your Edit profile and privacy settings.
    Section 5

    How To Share a Wishlist Link vs. Your Profile Link

    Split view comparing an Amazon profile page on one side and a wishlist page with a share button on the other

    Sometimes people don’t want your entire Amazon profile. They just want your wishlist, especially around birthdays, holidays, baby showers, or weddings.

    Those are two different links:

    • Amazon profile link → Your overall public profile
    • Amazon wishlist link → A specific list you created

    How To Get a Wishlist Link

    On Desktop:

    1. Go to Account & Lists.
    2. Click “Your Lists”.
    3. Select the list (e.g., “Wishlist,” “Birthday List,” “Baby Registry”).
    4. Look for “Send list to others,” “Share,” or a Share icon.
    5. Choose Copy link.

    On Mobile:

    1. In the app, open the menu (☰).
    2. Tap “Your Lists” or “Your Wish List.”
    3. Select the specific list you want to share.
    4. Tap Share and copy the link, or send via text, email, etc.

    You can set lists to:

    • Public – searchable and fully shareable
    • Shared – only people with the link can see
    • Private – only you can see

    If someone has specifically asked for your Amazon profile link to verify reviews, don’t send just your wishlist. Those are separate.

    List takeaway: Use your profile link for your overall Amazon identity and wishlist links for gift lists. Different links, different purposes.
    Section 6

    Where People Commonly Use Their Amazon Profile Link

    Collage of social bios, a brand rep checking Amazon reviews, and a group chat where an Amazon profile link is shared

    If you’re wondering, “Why would I ever need this link?” — here are common real-world examples.

    1. Brand Collaborations & UGC

    Brands or Amazon sellers might ask for your Amazon reviewer profile to:

    • See your historical reviews
    • Confirm that your account is active and legit
    • Check what kind of products you usually review

    Here, your full Amazon profile link is what they want.

    2. Influencer & Affiliate Content

    If you create content on TikTok, YouTube, Instagram, or a blog, you might:

    • Put your Amazon profile link in your bio or link-in-bio tool so people can see reviews
    • Combine it with your Amazon Storefront or Influencer storefront if you have one (different link, same ecosystem)

    3. Friends, Family, and Groups

    You might share your profile when:

    • Someone wants to see your reviews before buying something you recommended
    • You’re in a niche community (e.g., book clubs, tech groups, hobby forums) and they want to see your Amazon history
    Usage takeaway: Any time someone wants a peek at your Amazon activity — especially your reviews — your Amazon profile link is the clean, one-click way to show it.
    Section 7

    Quick FAQs About Amazon Profile Links

    Clean FAQ-style layout with icons representing privacy, links, and Amazon profiles

    1. Is my Amazon profile link public?

    Yes. Your profile page is public by design.

    But you control:

    • Your public name
    • Which lists are public/shared/private
    • Whether certain activity is visible

    If privacy is a concern, edit your profile and list settings before sharing.

    2. Can I change my Amazon profile URL?

    You generally can’t manually pick a custom URL like you do on social platforms (e.g., amazon.com/@yourname).

    However, Amazon may generate a more readable URL that includes your public name. Either way, whatever URL appears in your browser after visiting amazon.com/profile while logged in is the one to share.

    3. Is my order history visible from my profile link?

    No, your full order history is private.

    People may see your reviews that relate to items you bought, but they won’t see your entire purchase history or account details.

    4. Why does my profile show someone else’s name?

    If your account was created years ago or shared with a family member, the public profile name might not match what you expect.

    You can fix this by going to Profile → Edit profile and updating the public name.

    5. Do I need an Amazon account to view someone’s profile link?

    Most of the time, no. People can usually open and view a public profile link in a browser without logging in, as long as the content is public.

    FAQ snapshot: Your link is public, your order history isn’t, and your name + what shows on your profile are all under your control in the settings.
    Section 8

    Fast Recap: Your Amazon Profile Link in 30 Seconds

    Hero-style recap graphic highlighting an Amazon profile URL and icons for reviews, wishlists, and sharing

    TL;DR:

    • Your Amazon profile link is a unique URL leading to your public Amazon profile.
    • On desktop, go to Account → Profile, then copy the URL from your browser.
    • On mobile, open Your Account → Profile and use the Share/Copy link option — or use your mobile browser.
    • Tweak what shows on that page via Edit profile and privacy settings.
    • Use separate wishlist links for gift lists (different from your profile link).
    • Share your profile link with brands, friends, communities, or anywhere someone wants to verify your Amazon review activity.

    Now you’ve got your Amazon profile link in your digital back pocket — ready to paste, share, and flex those reviews whenever you need.


  • How To Host An Amazon Prime Watch Party


    How To Host An Amazon Prime Watch Party


    How To Host An Amazon Prime Watch Party

    Ever tried to watch a show with friends long-distance and spent half the night yelling, “Okay, press play on 3… NO, NOT YET!”?

    Yeah. We’re retiring that method today.

    If you have Amazon Prime Video, you can use Amazon Prime Watch Party to sync movies and shows with friends, chat in real time, and basically turn your couch into a tiny virtual theater.

    This guide walks you through what Amazon Watch Party is, how it works, who can join, how to fix common issues, and some fun ways to use it.


    Friends in different homes watching an Amazon Prime Video Watch Party in sync with chat

    What is Amazon Prime Watch Party?

    Amazon Prime Watch Party is a built-in feature of Prime Video that lets you watch the same movie or show with other people online, perfectly synced, with a group chat on the side.

    Zoom + Group Chat + Netflix Night — but fully baked into Prime Video.

    Key points:

    • Everyone watches the same thing at the same time (pause for snacks = paused for everyone).
    • There’s a chat window for commentary, reactions, and memes.
    • Only one person hosts the watch party, but multiple people can join.
    Quick takeaway: It’s the easiest way to do a virtual movie night if you all have Amazon accounts.

    Infographic of Amazon Watch Party requirements like Prime membership, supported devices, and internet

    What do you need for an Amazon Watch Party?

    Before you send out invites, make sure you’ve got the basics covered.

    1. An Amazon account

    • Host: Needs an Amazon Prime membership or Prime Video subscription.
    • Guests: In most cases, they also need Prime if you’re watching Prime-included titles. If the content is rent/buy only, each participant typically needs to rent or buy the same title on their own account.

    2. Supported device

    Amazon Watch Party does not work everywhere. At the time of writing, it’s supported on:

    • Most desktop/laptop web browsers (Chrome, Firefox, Edge, Safari – ideally updated)
    • Many Fire TV devices
    • Some smart TVs and streaming devices via the Prime Video app

    It may not work properly on:

    • Older smart TV apps
    • Some game consoles
    • Certain mobile browsers

    Use a desktop or laptop browser, or a Fire TV device with the Prime Video app.

    3. Stable internet connection

    Obvious but important: if your Wi‑Fi is chaos, your watch party will be, too.

    Aim for:

    • At least 5 Mbps per person for HD
    • Wired connection if possible for the host
    Quick checklist before you host:

    • You have Prime or Prime Video
    • Everyone has Amazon accounts
    • Everyone can access the same title in their region
    • You’re all on a supported device/app

    Step-by-step visual of creating an Amazon Prime Watch Party and sharing the invite link

    How to start an Amazon Prime Watch Party (step-by-step)

    Let’s walk through the desktop/laptop browser flow first, since that’s the most common.

    Step 1: Open Prime Video

    1. Go to Prime Video in your browser.
    2. Sign in to your Amazon account.

    Step 2: Choose what you want to watch

    • Browse to the movie or TV show you want.
    • Confirm it’s either Included with Prime for everyone or that everyone is willing to rent/buy it.
    Pro tip: For hassle-free nights, stick to Prime-included titles so people don’t get blocked.

    Step 3: Click “Watch Party”

    Once you’re on the title’s detail page, look for a Watch Party button or icon. Depending on your interface, it may be near:

    • The Play button
    • The More options / three dots menu

    Click Watch Party.

    Step 4: Name your watch party

    You’ll be asked to enter a name. This is your display name in the chat, not the event title.

    Examples:

    • “Movie Night Chaos Crew”
    • “Emily’s Birthday Watch Party”
    • “Office Meme Night”

    Hit Create Watch Party.

    Step 5: Share the invite link

    Amazon will give you a shareable link. That’s your golden ticket.

    • Copy it and drop it into your group chat, text thread, Discord, or email.
    • Anyone with the link (and access to the title) can request to join.

    Step 6: Start the show

    Once people join:

    • The host controls playback: play, pause, skip, etc.
    • Everyone is synced automatically.
    • Use the chat panel to talk during the show.

    You can start the movie even if not everyone has arrived yet — latecomers can still join via the link.

    Mini takeaway: The hardest part is honestly choosing what to watch.

    Guest view for joining an Amazon Prime Watch Party with synced playback and chat

    How do guests join an Amazon Watch Party?

    If you’re not hosting but got a link, here’s what to do.

    1. Click the invite link you received.
    2. Sign in with your Amazon account (or create one).
    3. Make sure:
      • You have Prime (if it’s a Prime title), or
      • You’ve rented/purchased the title if required
    4. Confirm you’re on a supported browser/device.
    5. Once in, you’ll see the video player and chat.

    You don’t control playback — think of yourself as in a virtual theater where only one person has the remote.

    Guest rule of thumb: If you can watch the title on your own Prime Video account, you can probably join the watch party for it.

    Side-by-side comparison of Amazon Watch Party and third-party watch apps

    Can you use Amazon Watch Party on TV?

    Yes, but with some important notes.

    Fire TV devices

    On many Fire TV sticks and Fire TV devices, Prime Video supports Watch Party directly:

    1. Open the Prime Video app.
    2. Select the title.
    3. Look for and select Watch Party.
    4. Join using the on-screen or shared link flow.

    Smart TVs & other devices

    Support varies. Some smart TV Prime Video apps will show the Watch Party option, others won’t.

    If yours doesn’t:

    • Use your laptop/desktop for video and chat.
    • Or cast/mirror your computer screen to the TV while using the browser.
    Takeaway: If you want the least amount of troubleshooting, use either desktop browser or Fire TV.

    Amazon Watch Party vs. other watch party apps

    You might be wondering: why not just use a random third-party extension?

    Pros of Amazon Watch Party

    • Built into Prime Video — no extra installs on desktop.
    • Official support from Amazon.
    • Video is high quality and usually more stable than DIY sync tools.
    • Host controls make it simple for less tech-savvy friends.

    Cons / limitations

    • Everyone needs an Amazon account, and often Prime.
    • Library is limited to Prime Video content (obviously).
    • Cross-country/region parties can be tricky if the title isn’t available everywhere.
    Bottom line: If you’re all already using Prime Video, Amazon Watch Party is usually simpler and more reliable than third-party tools.

    Troubleshooting Amazon Watch Party issues like region lock, Wi-Fi, and unsupported device

    Common issues with Amazon Prime Watch Party (and how to fix them)

    Even when the tech is solid, something always goes slightly wrong on movie night. Here’s a quick troubleshooting guide.

    1. “I don’t see the Watch Party button.”

    Possible fixes:

    • Make sure you’re on a supported device (desktop browser or Fire TV is best).
    • Confirm you’re on the Prime Video site/app, not a random Amazon page.
    • Try another browser (Chrome, Firefox, Edge, Safari) and update it.
    • Check that the title is eligible — some live events or certain channels may not support Watch Party.

    2. “It says I can’t watch this title.”

    This often means:

    • The title isn’t available in your region.
    • You don’t have Prime, and it’s a Prime-only title.
    • It’s a rental or purchase and you haven’t rented/purchased it yet.

    Ask the host to pick a different title that’s Prime-included and available in your country, or rent/buy the title if you’re okay with that.

    3. Video is lagging or out of sync

    • Close extra tabs and apps using bandwidth.
    • If possible, switch to wired Ethernet.
    • Lower the video quality in Prime Video settings.
    • As a last resort, leave and rejoin the watch party.

    4. Chat not working

    • Refresh the page.
    • Make sure you’re not behind a super-strict VPN or firewall that blocks websockets or chat services.
    Quick fix mindset: If something’s weird, try a different browser, device, or network. 80% of issues vanish that way.

    Collage of fun themed Amazon Watch Party ideas and virtual hangouts

    Fun ideas for your next Amazon Prime Watch Party

    Okay, you know how it works. Now let’s make it fun.

    1. Themed movie nights

    Pick a theme and commit.

    Examples:

    • ’90s Nostalgia Night – Old-school comedies or rom-coms.
    • Action Overload – Explosions, car chases, questionable plot logic.
    • Comfort Rewatch Night – Everyone votes on a movie they’ve already seen and loved.

    You can even:

    • Ask everyone to bring a themed snack.
    • Make a silly Zoom/Discord background to match.

    2. Long-distance date night

    Watch Party is great for couples or friends doing the long-distance thing.

    Ideas:

    • Pick a series to binge together weekly.
    • Do a cook-along + movie: cook while on video chat, then switch to Watch Party for the film.

    3. Family watch party across time zones

    Relatives spread all over? Use Watch Party to:

    • Watch holiday movies together.
    • Start a monthly family movie night tradition.

    Pro tip: Use a separate voice call (Zoom/FaceTime/Discord) for people who like talking out loud, and keep the Watch Party chat for text.

    4. Remote team or club events

    If you run a remote team, book club, or community, you can use Amazon Watch Party to:

    • Host a movie night.
    • Watch a documentary and then discuss afterward.

    Have everyone drop questions and reactions in chat as you go, then hang out on a call at the end.

    Takeaway: Watch Party is more flexible than just “let’s watch a random movie.” You can turn it into a recurring event or tradition.

    Tips to host a smooth, drama-free watch party

    A little planning goes a long way. Here’s how to level up your host game.

    1. Decide the title ahead of time.
      • Run a quick poll in your group chat.
      • Confirm the movie is available in everyone’s region.
    2. Share the link early.
      • Send the watch party link 10–15 minutes before start time.
      • Tell people to sign in and check access before showtime.
    3. Set some light ground rules.
      • Will you pause for bathroom/snack breaks?
      • Is heavy chat okay during emotional scenes, or should people chill? (No spoilers!)
    4. Have a backup plan.
      • If the title doesn’t work for someone, have a second choice ready.
      • Worst case: just hop on a call and stream something separately, but that’s rarely necessary.
    Host mantra: Over-communicate once, troubleshoot less later.

    Is Amazon Prime Watch Party worth using?

    If you:

    • Already have Prime Video
    • Want an easy, low-effort way to watch something in sync with others
    • Are tired of “3…2…1… press play!” chaos

    …then yes, Amazon Prime Watch Party is absolutely worth using.

    It’s not perfect — device support can be a bit inconsistent, and everyone usually needs Prime or access to the same title. But for most Prime households and friend groups, it’s one of the simplest, most stable ways to do a virtual movie night.

    Quick start recap: How to use Amazon Prime Watch Party

    One-minute setup recap

    1. Open Prime Video on a supported browser or Fire TV.
    2. Pick a movie or show that everyone can access.
    3. Click Watch Party, name your chat, and create.
    4. Share the link with friends.
    5. Hit Play and enjoy the synced chaos together.

    Next time someone suggests a movie night and half the group lives in different states, you’ll know exactly what to do.


  • Amazon LPN Numbers Explained


    Amazon LPN Numbers Explained


    Amazon LPN Numbers Explained

    If you’ve ever stared at a weird little code on an Amazon package or shipment and thought, “What on earth is an Amazon LPN?”—you’re in the right place. Let’s decode it in plain English, no warehouse badge required.


    Close-up of an Amazon package label highlighting an LPN code that looks like a license plate

    What Is an Amazon LPN?

    LPN in the Amazon world usually stands for License Plate Number.

    Think of it like a unique license plate for an item or package inside Amazon’s logistics system. It’s a scannable ID (usually a barcode + alphanumeric code) that lets Amazon know:

    • What the item is
    • Which order or shipment it belongs to
    • Where it’s supposed to go next
    • What happened to it in the past (returns, re-labels, investigations, etc.)

    In other words, an Amazon LPN is a tracking identity for internal handling and inventory, separate from the public tracking number you see as a customer.

    Quick takeaway: LPN = internal ID tag Amazon uses to track and control individual units or packages.


    Amazon fulfillment associates scanning LPN barcodes on packages and totes in a warehouse

    Where Do You See Amazon LPN Labels?

    You’ll typically see LPN labels in a few situations:

    1. On returned items
      Many Amazon warehouse deals, liquidation pallets, or returns will have an LPN sticker on top of, or near, the original barcode. This tells Amazon (and any downstream handler) that this item went through some special process like a return, re-boxing, or inspection.
    2. Inside fulfillment centers
      Associates scan LPNs to move units between bins, totes, packing stations, and dock doors. Every scan updates the system: “This unit moved from location A to B.”
    3. On liquidation or surplus stock
      If you buy inventory from Amazon liquidation marketplaces (like pallets of returns), you’ll often see a lot of LPN tags used for internal audit and history.
    Quick takeaway: If your item has an LPN sticker, it’s been in Amazon’s internal workflow—often as a return, warehouse deal, or processed item.


    Comparison graphic showing different codes including an Amazon LPN, tracking number, ASIN, and FNSKU

    What Does an Amazon LPN Look Like?

    LPN labels can vary a bit, but they usually have:

    • A barcode (the scannable part)
    • An alphanumeric code like LPN RR 1234 5678 9012 or similar
    • Sometimes a prefix (like LPN RR) that hints at the process or system that created it

    These codes are not meant for customers to manually look up, but they’re gold for internal tracking.

    Quick takeaway: If it looks like a random license plate stuck to your box, it’s probably the LPN.


    Infographic connecting an LPN label on a box to icons for returns, inspection, inventory, and liquidation

    Amazon LPN vs Tracking Number vs FNSKU vs ASIN

    Let’s untangle the alphabet soup.

    • LPN (License Plate Number)
      Internal identifier for a specific unit or package in Amazon’s logistics workflow.
    • Carrier tracking number (UPS/USPS/FedEx)
      Public number you and the customer use to track shipping progress from carrier to doorstep.
    • ASIN (Amazon Standard Identification Number)
      Amazon’s catalog ID. One ASIN can represent thousands of identical units of a product.
    • FNSKU (for FBA sellers)
      The label Amazon uses to tie a specific physical unit to a specific seller’s offer in FBA.

    How they relate:

    • ASIN: “This is the product listing.”
    • FNSKU: “This is Seller X’s unit of that product.”
    • LPN: “This particular copy of the unit is here, was returned, inspected, etc.”
    • Tracking number: “This whole package is moving through the external shipping carrier.”
    Quick takeaway: LPN lives in the warehouse and logistics layer, not the customer-facing order tracking layer.


    Stylized visualization of Amazon tracking one box with an LPN label through returns, inspection, inventory, and liquidation

    Why Does Amazon Use LPN Numbers?

    Because at Amazon’s scale, “just remembering where things are” is not a strategy.

    LPNs help Amazon:

    1. Track individual units, not just SKUs
      If a specific unit was damaged, mis-picked, or returned, the LPN lets Amazon track that exact unit’s story.
    2. Handle returns efficiently
      When a return comes in, applying an LPN lets the system know:

      • Why it was returned
      • Its inspection status (sellable, refurbish, dispose, liquidate)
      • Where it ended up (back to inventory, warehouse deals, liquidation, etc.)
    3. Improve quality control
      If multiple issues trace back to units with similar LPN histories (same shipment, same vendor, same lot), Amazon can investigate patterns and fix upstream problems.
    4. Avoid barcode conflicts
      Lots of manufacturers use their own barcodes. The LPN gives Amazon a clean, standardized ID for internal operations without changing the original product barcode.
    Quick takeaway: LPNs let Amazon treat every unit like it has a unique story—and track that story reliably.


    Customer at home examining an LPN sticker on a delivered box while checking order details online

    I’m a Customer: Should I Worry If My Item Has an LPN Sticker?

    Short answer: usually, no.

    An LPN doesn’t automatically mean “used” or “broken.” It often means:

    • The item went through a return or reprocessing step
    • The item may be from Amazon Warehouse Deals (open box, used, or like new)
    • It was handled in a way that Amazon needed additional traceability

    But here’s what you should check:

    1. Compare to your listing condition

      • Bought as New but box looks opened, taped up, or has extra LPN and quality-check stickers? That’s a red flag.
      • Bought as Used / Renewed / Warehouse Deals? Extra labels are normal.
    2. Inspect the packaging and contents

      • Look for damage, missing accessories, repackaging.
      • Take photos if something looks off.
    3. Contact Amazon support if it feels wrong

      • If you ordered new and it clearly looks like a return, you can request a replacement or refund.
    Quick takeaway: LPN alone isn’t a problem; mismatch between condition you paid for and what you received is the real issue.


    Reseller inspecting Amazon return items with LPN stickers and relabeling inventory in a small warehouse

    I’m a Reseller: What Do Amazon LPN Labels Mean For Me?

    If you buy Amazon return pallets, surplus, or liquidation stock, you’ll see LPN stickers everywhere.

    Here’s what to keep in mind:

    1. LPNs Are History Markers, Not Just Stickers

    Each LPN ties to an internal record: why the item was returned, where it came from, etc. You can’t usually access those records directly, but the presence of an LPN tells you the item has a known past.

    Translation: don’t assume it’s brand new.

    2. Don’t Resell With LPN Labels Still On

    Best practice:

    • Remove or cover LPN labels before reselling on other marketplaces.
    • Scan and use your own barcodes or inventory labels.

    Leaving LPNs on:

    • Looks unprofessional
    • Can confuse buyers who google “Amazon LPN” and panic about getting a return

    3. Test and Inspect Aggressively

    Because these are often returns:

    • Physically inspect each item
    • Test electronics and moving parts
    • Verify completeness (manuals, chargers, cables, accessories)

    Use a simple internal grading system like:

    • A: New/open box, complete
    • B: Light use, minor cosmetic wear
    • C: Heavier wear, or missing accessories
    • D: For parts/repair
    Quick takeaway: For resellers, LPN = “extra due diligence required.” Treat every LPN-tagged unit as a story you need to verify.


    Amazon parcel on a table with the LPN label clearly visible, emphasizing it is for internal tracking only

    Can I Track an Order Using an Amazon LPN Number?

    No.

    LPNs are internal-only identifiers. They’re not meant for:

    • Customers
    • Carriers (UPS/USPS/FedEx)
    • Public order tracking

    To track an Amazon order, you’ll use:

    • Your Amazon order ID inside your account
    • The carrier tracking number (once shipped)

    Typing an LPN into Google or a carrier site will do…nothing useful.

    Quick takeaway: LPNs are for Amazon’s scanners, not your browser.


    Visual breakdown of different Amazon and carrier codes with the LPN highlighted as an internal unit ID

    Does Every Item in Amazon Have an LPN?

    Not always visible, and not always in the same form.

    • Some items are tracked more at the bin or tote level rather than as individually labeled units visible to you.
    • Items going through returns, refurbishing, or special handling are more likely to get a visible LPN sticker.

    Think of it like this: the more complicated the item’s journey, the more likely it gets its own visible “license plate.”

    Quick takeaway: Many items are LPN-tracked internally, but only some will ever show you that label.


    Stylized central package with an LPN label connected by lines to multiple process icons like returns and inspection

    Practical Scenarios: Amazon LPN in Real Life

    Scenario 1: You Ordered New, Got Something “Sus”

    You buy a “New” gadget. Box arrives with:

    • LPN sticker
    • Torn shrink wrap
    • Box looks like it’s been opened before

    What to do:

    1. Take a few photos.
    2. Check your order to confirm it was sold as New, not Warehouse Deals.
    3. Contact Amazon support and say something like:
      “This item was sold as new but appears to have been previously opened/returned. It has an LPN label on it, tape marks, and missing seals. Can I get a replacement or refund?”

    Result: In most cases, they’ll make it right.

    Scenario 2: You’re Flipping Liquidation Stock

    You buy a pallet of Amazon returns. Everything has LPN stickers, random tape, and mixed conditions.

    Your playbook:

    1. Set up a testing/check station
      Clean table, power strips, tools, cleaning wipes.
    2. Process one item at a time

      • Remove LPN/extra Amazon labels
      • Inspect and test
      • Decide condition (A/B/C/D)
      • Repack nicely and label with your own SKU
    3. List with honest descriptions
      The more accurate your condition notes, the fewer returns and headaches later.

    Outcome: LPN becomes a helpful warning label: “pay attention to this one’s past.”


    Neatly arranged Amazon parcel with a clearly visible LPN code representing the item’s internal license plate

    Key Takeaways: Amazon LPN in One Minute

    If you skimmed everything (no judgment), here’s the core:

    • Amazon LPN stands for License Plate Number—a unique internal ID used to track individual units or packages inside Amazon’s systems.
    • You’ll often see LPN stickers on returns, warehouse deals, and liquidation items.
    • An LPN doesn’t automatically mean something is bad, but it does mean it’s been through extra handling.
    • Customers can’t use LPNs to track orders; they’re strictly internal.
    • Resellers should remove LPN labels, test items thoroughly, and never assume LPN-tagged products are brand new.

    If you ever spot an Amazon LPN and wonder what secret it’s hiding, just remember: it’s basically the item’s license plate—and like any good plate, it tells the system exactly where it’s been and where it’s supposed to go next.