Amazon Arbitrage Made Simple
If you’ve ever scanned Amazon prices and thought, “Wait… people are really making money just reselling stuff?”—yes, they are. And no, it’s not magic.
It’s called Amazon arbitrage, and if you like hunting for deals and don’t mind some boring-but-profitable systems, it can absolutely be a real side hustle (or full-time gig) instead of just a TikTok buzzword.
Let’s walk through what it is, how it works, what it really takes, and whether it’s worth jumping in.
What Is Amazon Arbitrage?
Amazon arbitrage is when you buy products from one place at a lower price and resell them on Amazon at a higher price, keeping the difference after fees.
In practice, there are two main flavors:
- Retail arbitrage – You buy from physical stores (Walmart, Target, TJ Maxx, clearance racks, liquidation stores, etc.) and resell on Amazon.
- Online arbitrage – You buy from websites (Target.com, Walmart.com, brand sites, closeout sites) and ship to your home (or prep center), then into Amazon.
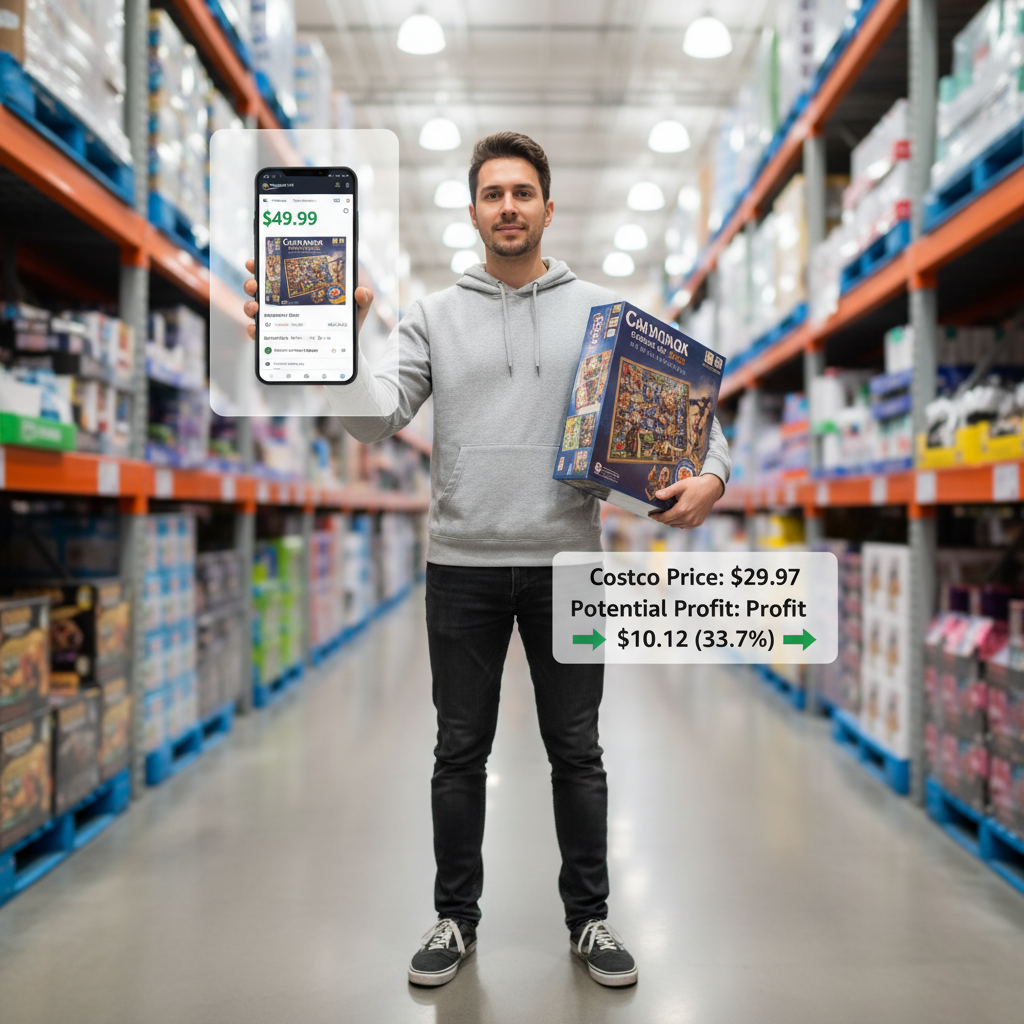
Example:
- You find a LEGO set on Target clearance for $25.
- On Amazon, that exact set is selling for $54.99.
- After Amazon fees and shipping, your profit might be ~$12–15 per unit.
- You buy 10 units, send them to Amazon FBA, and the profit scales.
That’s arbitrage in a nutshell: you’re not inventing products—you’re moving existing products from where they’re cheap to where buyers are already paying more.
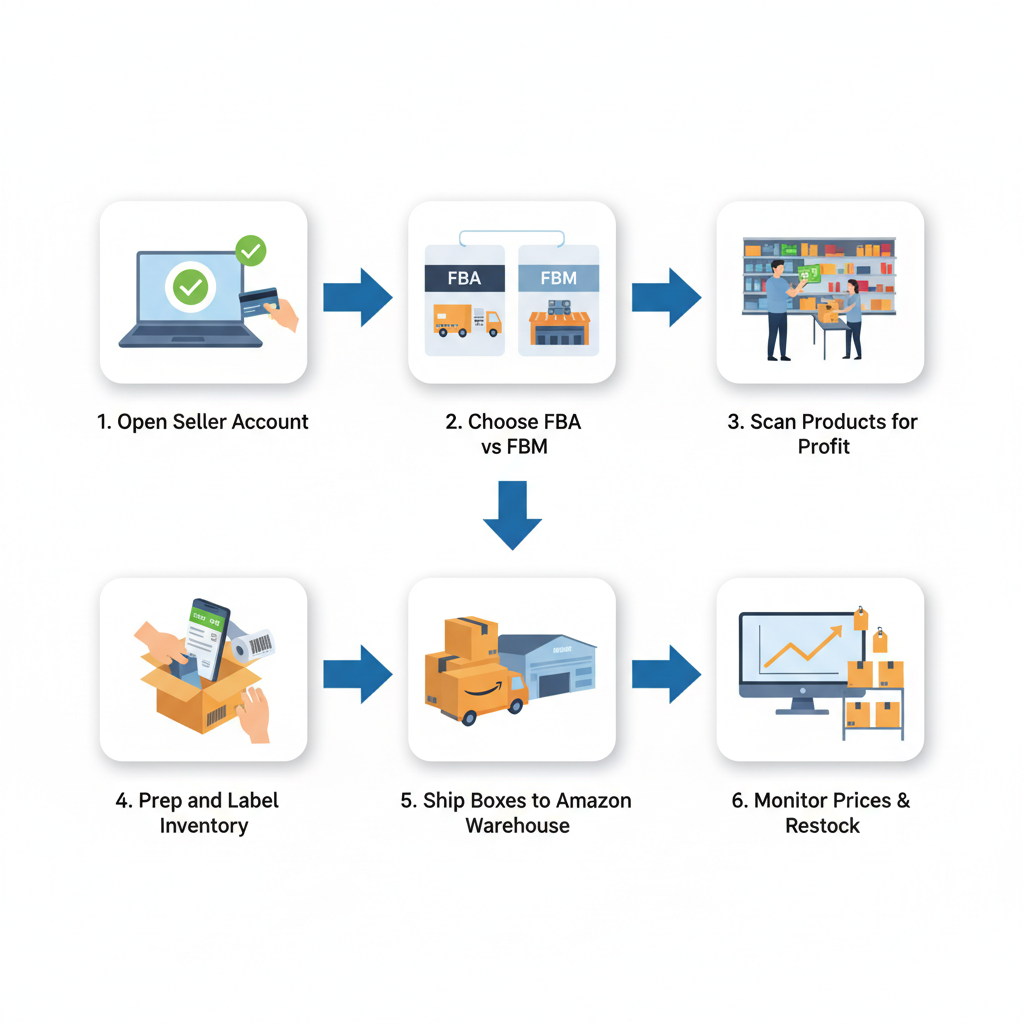
How Does Amazon Arbitrage Actually Work Step-by-Step?
Let’s break this into a simple workflow.
1. Open an Amazon Seller Account
You’ll need:
- An Amazon Seller account (Individual or Professional)
- Tax info, bank info, and identity verification
Most arbitrage sellers go with the Professional plan once they’re serious because:
- You can use advanced tools and reports
- You don’t pay the per-item fee (helpful once you’re selling more than a few dozen items/month)
2. Decide: FBA or FBM?
Two main fulfillment options:
- FBA (Fulfilled by Amazon) – You ship inventory to Amazon’s warehouses. They handle storage, shipping, customer service, and returns. You pay FBA and storage fees.
- FBM (Fulfilled by Merchant) – You store and ship products yourself (or via a 3rd party). Lower Amazon fees, but more work.
Most arbitrage sellers use FBA because:
- Prime badge = higher conversion
- You can scale without shipping orders every day
3. Research Products & Scan for Profits
This is where the game is won or lost.
You’re looking for:
- Products you’re allowed to sell (not gated/ restricted)
- Enough demand (they actually sell regularly)
- A price difference big enough to leave room for Amazon fees + shipping + your profit
Common tools & methods:
- Amazon Seller App – Free, lets you scan barcodes in stores and see estimated fees and ROI.
- Keepa / similar tools – Show price history and sales rank trends so you don’t buy something that used to sell well but is now dead.
- Online arbitrage extensions – Chrome extensions that overlay profit data on other retail sites.
Typical target: Many sellers aim for at least 30–40% ROI and a few dollars minimum net profit per item after all fees.
4. Buy, Prep, and Label the Inventory
Once the numbers make sense:
- Buy the products
- Remove clearance stickers, price tags, etc.
- Polybag or bubble-wrap if required (to meet Amazon packaging standards)
- Label items with FNSKU barcodes (or use Amazon’s label service for a small fee)
If you do online arbitrage, you can:
- Ship products to your home and prep them yourself
- Or use a prep center that receives, inspects, preps, and forwards to Amazon for you (popular for scaling).
5. Ship to Amazon FBA
In your Seller Central account:
- Create a shipping plan
- Print box labels
- Ship via UPS or partnered carriers
Once your items arrive and check in:
- They go live on your Amazon listing (you’re sharing the buy box with other sellers)
- Sales start rolling in when you’re priced competitively and the listing has demand
6. Monitor Prices, Reprice, and Restock
This is ongoing work:
- Use repricing rules or software to stay competitive without racing to the bottom
- Track sell-through rate, profit, and returns
- Reinvest profits into more inventory that meets your criteria
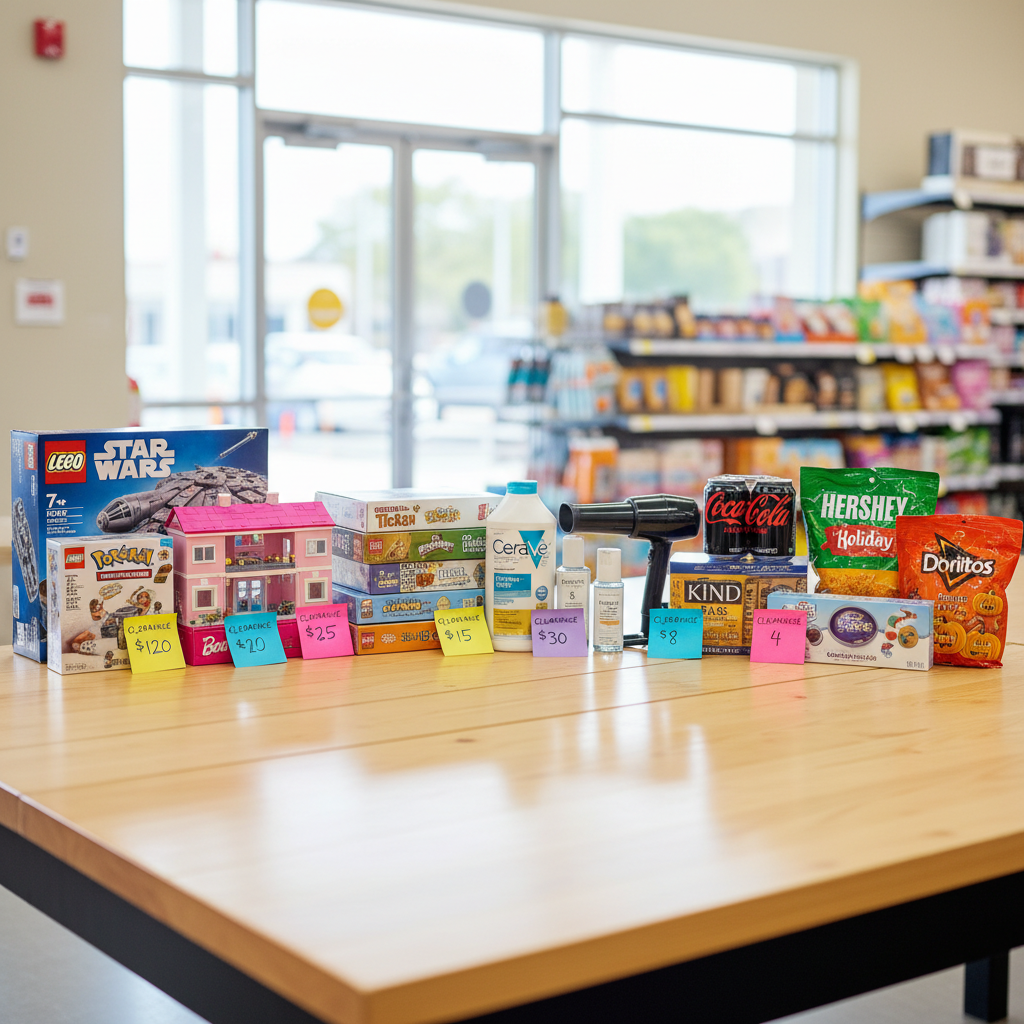
What Kinds of Products Work Best for Amazon Arbitrage?
There’s no single magic category, but some patterns show up frequently.
Popular categories:
- Toys & games (especially Q4 / holiday season)
- Health & personal care
- Grocery and pantry items
- Household essentials
- Branded clothing/shoes (if ungated)
You’re usually looking for:
- Brand-name items with steady demand
- Discontinued or seasonal products going on clearance
- Multipacks or bundles (e.g., 3-pack of a grocery item) that customers prefer buying on Amazon
Examples:
- Seasonal candy – Bought after a holiday on clearance, resold as multipacks.
- Discontinued shampoo scent – Loyal fans will pay a premium when it vanishes from shelves.
- Board games – Target clearance at $8, selling on Amazon at $29.99 with strong sales rank.

How Much Money Can You Make with Amazon Arbitrage?
Short answer: it depends entirely on your capital, consistency, and how smart your sourcing is.
Realistic ranges people see (once they’ve learned the ropes):
- Side hustlers: A few hundred to a few thousand dollars a month in profit
- Part-time serious sellers: $1,000–$5,000+ profit/month
- Full-time, scaled operations: beyond that, often by adding wholesale and private label later
Factors that impact your earnings:
- Capital – How much you can invest in inventory
- Time – How many hours you can spend sourcing
- Tools – Better data = fewer bad buys
- Risk management – Avoiding IP issues, bad categories, and slow movers
Costs, Fees, and Startup Budget
You don’t need tens of thousands to start, but you do need some money for:
- Inventory – Even a test batch might be $200–$500
- Amazon fees – Referral fees, FBA fees, storage fees
- Shipping to Amazon – UPS partnered shipping is cheaper but still a cost
- Supplies – Boxes, tape, labels, polybags, bubble wrap
- Software (optional but helpful) – Keepa, sourcing tools, repricers
A common recommendation:
- Start with whatever you can afford to lose without stress (e.g., $300–$1,000)
- Treat it as paid education while you learn the system
Is Amazon Arbitrage Legal and Allowed?
Let’s clear up the big concern.
Yes, buying products at retail and reselling them is generally legal in the U.S. thanks to the “first-sale doctrine,” as long as they’re genuine and in the same condition.
That said, there are important caveats:
- Brand restrictions – Amazon may restrict certain brands or categories. If your Seller Central says you’re gated, do not list that product.
- IP complaints – Some brands aggressively protect distribution and file complaints against 3rd-party sellers.
- Condition rules – Items sold as “New” must truly be new: unopened, unused, and in retail-ready condition.
Always:
- Check if you’re ungated for a brand/category
- Keep receipts/invoices to prove authenticity
- Avoid “gray area” items like high-end cosmetics or luxury brands until you deeply understand the risks
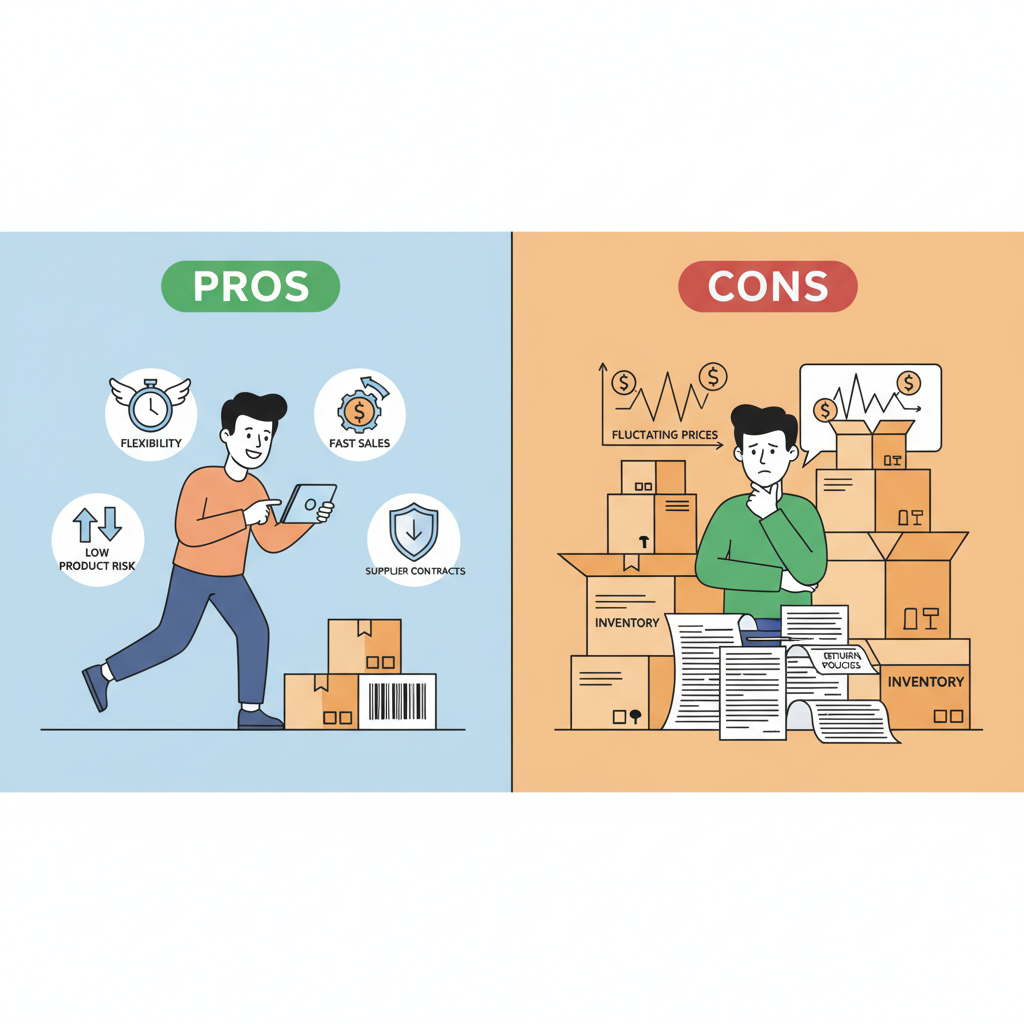
Pros and Cons of Amazon Arbitrage
Let’s be honest about both sides.
Pros
- Low product-creation risk – You’re selling what already sells.
- Fast path to first sales – You can get revenue flowing faster than building a brand from scratch.
- Flexible – Great as a side hustle; you can source evenings/weekends.
- Learn Amazon fast – You gain hands-on experience with FBA, shipping, pricing, and customer behavior.
Cons
- Time-consuming sourcing – You’ll scan a lot of duds before you find winners.
- Thin margins at times – Competition can erode profits if you’re not careful.
- Not infinitely scalable – Pure arbitrage usually hits a ceiling unless you add wholesale or private label.
- Policy risk – Brand restrictions, IP complaints, and shifting rules are part of the terrain.
Common Mistakes New Arbitrage Sellers Make
Learn from other people’s pain, not your wallet.
- Ignoring Amazon fees
They see a $10 gap between store price and Amazon price and assume it’s profit. After fees, shipping, and taxes, it might be $1—or a loss. - Not checking sales rank and history
Just because something is listed for $80 doesn’t mean it sells for $80. Always check sales rank and price history. - Buying too deep, too fast
Finding one good product and buying 200 units before proving demand is a fast track to sitting on stale inventory. - Chasing every hot tip
Telegram groups, Discords, TikToks: people shout “buy this now!” Without your own analysis, you can end up as the last one holding the bag. - Ignoring Amazon’s condition rules
Selling shelf-damaged boxes as “New” can earn you bad reviews or even account issues.
Simple Starter Strategy for Amazon Arbitrage
If you want a practical entry point, try this:
Step 1: Learn the Basics (1–3 days)
- Set up your Amazon Seller account.
- Watch a few in-depth tutorials on using the Amazon Seller App and Keepa.
- Read Amazon’s guidelines on condition, restricted products, and FBA requirements.
Step 2: Start with Retail Arbitrage (1–2 weeks)
- Visit local stores: Walmart, Target, TJ Maxx, Marshalls, Ross, grocery chains.
- Focus on clearance and end-cap shelves.
- Use the Amazon Seller App to:
- Scan products
- Check if you’re allowed to sell them
- View fees and net profit estimates
- Buy a small test batch of clear winners (good ROI, solid demand).
Step 3: Ship to FBA and Learn the Flow
- Prep your first 20–50 units
- Create your first FBA shipment
- Watch how quickly items check in and sell (or don’t)
Step 4: Analyze and Adjust
- Which categories sold fastest? Which had the best margins?
- Were your estimates accurate after fees and returns?
- Refine your sourcing rules based on real data.
Step 5: Add Online Arbitrage (Optional)
- Once you’re comfortable, start sourcing from websites to save time and scale.
- Consider a prep center if you don’t want inventory stacked in your living room.
Is Amazon Arbitrage Still Worth It?
Yes—for the right person.
Amazon arbitrage makes the most sense if:
- You like hunting for deals and patterns
- You’re willing to treat it like a real business (track numbers, follow rules)
- You want a relatively low-barrier entry into e‑commerce to learn the ropes
It’s less ideal if:
- You hate repetitive tasks like scanning, labeling, boxing
- You’re looking for 100% passive income
- You’re unwilling to deal with occasional Amazon headaches (policy changes, delayed check-ins, returns)
Think of arbitrage as “Amazon school you get paid to attend.” You’ll learn sourcing, pricing, logistics, inventory management, and risk—all skills that transfer into:
- Wholesale
- Private label
- Shopify or other e‑commerce models
What to Do Next
If this sounds like your kind of nerdy fun (and profit):
- Create your Amazon Seller account.
- Download the Amazon Seller App and start scanning in your next store visit—even if you don’t buy anything yet.
- Set a small test budget (e.g., $300–$500) and aim to send in your first shipment within 2–3 weeks.
Give yourself permission to treat the first month as a paid experiment. Your goal isn’t to get rich immediately—it’s to get data, skills, and confidence.
Because once you realize you can turn a Saturday clearance run into actual Amazon payouts… you’ll never look at a red clearance sticker the same way again.
Leave a Reply