Amazon Reimbursement Audit Playbook

If you’re an Amazon seller and you suspect Amazon owes you money… you’re probably right.
Lost inventory, damaged units, mis-measured dimensions, FBA fee errors — it all adds up. The problem? Amazon doesn’t always reimburse you automatically, and the platform is definitely not designed to make it obvious.
That’s where an Amazon reimbursement audit comes in.
In this post, we’ll break down what an Amazon reimbursement audit is, what you should be looking for, and how to build a repeatable process (or hire it out) so you stop leaving money in Amazon’s pocket.
What is an Amazon reimbursement audit?

An Amazon reimbursement audit is a systematic review of your Amazon Seller Central data (mostly FBA-related) to find money Amazon should have paid you back — but didn’t.
You’re basically playing detective on:
- Inventory that went missing or got damaged in Amazon’s warehouses
- Returns that were refunded to the buyer but never fully debited from your stock
- Orders where Amazon charged the wrong size/weight FBA fees
- Removal orders and disposals that don’t match what actually happened
- Shipment discrepancies between what you sent and what Amazon received
Amazon does reimburse for some of this automatically, but not all, and not always correctly. An audit helps you:
- Recover lost profit
- Clean up your inventory and financial records
- Spot operational issues (bad prep, poor packaging, mislabeled products, etc.)
Why Amazon actually owes you money (more often than you think)

Let’s be honest: Amazon runs one of the most complex logistics networks on the planet. Things go wrong. A lot.
Here are the most common ways money slips through the cracks:
1. Lost or damaged inventory in FBA
Inventory can be:
- Lost in Amazon’s warehouse
- Damaged by Amazon during handling
- Lost or damaged during inbound shipment from you to FBA
In many cases, Amazon is supposed to either:
- Reimburse you, or
- Replace the units
If they don’t, or if they reimburse at the wrong value, your audit should catch it.
Example:
You ship 200 units to FBA. Amazon checks in only 184 and marks the shipment as “closed.” If you’re not auditing, you might never notice those 16 units vanished.
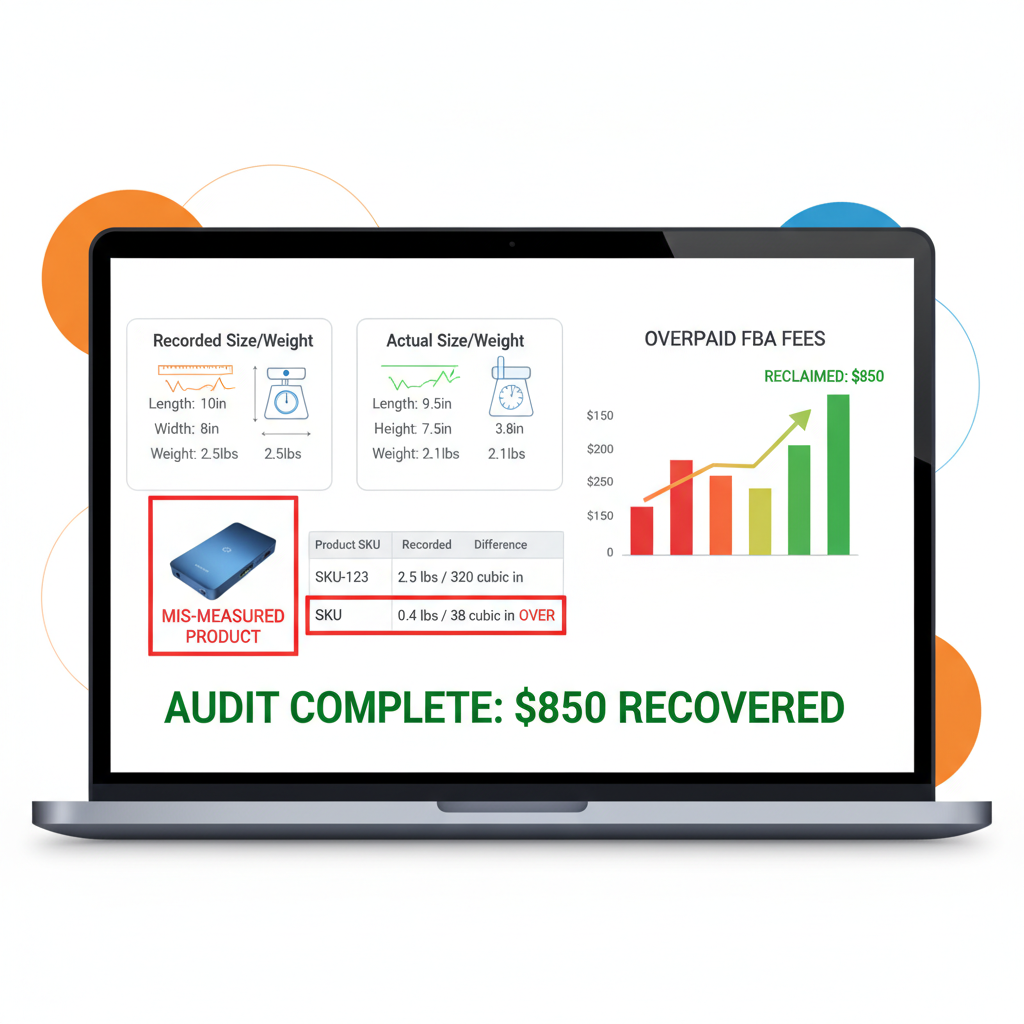
2. FBA fee errors (dimensions, weight, and category)
Amazon’s FBA fee structure is based heavily on size and weight tiers. If Amazon measures your product incorrectly, you can be charged more on every single order.
Common issues:
- Wrong product dimensions recorded
- Wrong weight class
- Incorrect product category (which changes fee schedules)
Example:
Your product is a small, 7 oz item. Amazon mis-measures it as oversize, 2 lb. That error could quietly bleed thousands of dollars per year across hundreds or thousands of orders.
Auditing here means:
- Checking the dimensions/weight Amazon has on file
- Comparing fees charged vs. what should have been charged
- Opening cases with correct measurements and evidence
3. Return and refund mismatches
Returns are messy. You’ve got multiple moving pieces:
- Buyer gets a refund
- Item is (supposedly) sent back
- Amazon evaluates condition
- Inventory is either returned to sellable stock, marked as damaged, or disposed of
Things that commonly go wrong:
- Buyer is refunded, but the item is never returned
- Buyer is refunded, item is returned damaged, and you don’t get reimbursed
- Amazon marks an item as sellable when it’s clearly not (leading to future returns & bad reviews)
Example:
A customer gets a full refund for a $60 product, but the item never makes it back to FBA. If Amazon doesn’t reimburse you and you don’t audit, that $60 is just gone.
4. Shipment discrepancies and inbound issues
When you create an inbound FBA shipment, you’re telling Amazon:
“I’m sending X units of these SKUs.”
If Amazon receives fewer units than you shipped, your shipment might show as:
- Closed with a discrepancy
- Marked as “shortage”
Sometimes you’re at fault (actually under-shipped), but often units are:
- Received but mis-scanned as another SKU
- Lost in transit within Amazon’s network
Your audit should:
- Compare your shipping records (and carrier proof) to Amazon’s received quantities
- Flag shipments with shortages and old unresolved discrepancies
5. Removal orders and disposal issues
When you request a removal or disposal order, Amazon is supposed to:
- Remove the correct number of units
- Charge you the correct removal / disposal fees
- Reflect accurate inventory changes
If there are mismatches, you may:
- Be missing inventory that was never actually removed
- Be overcharged for removals or disposals
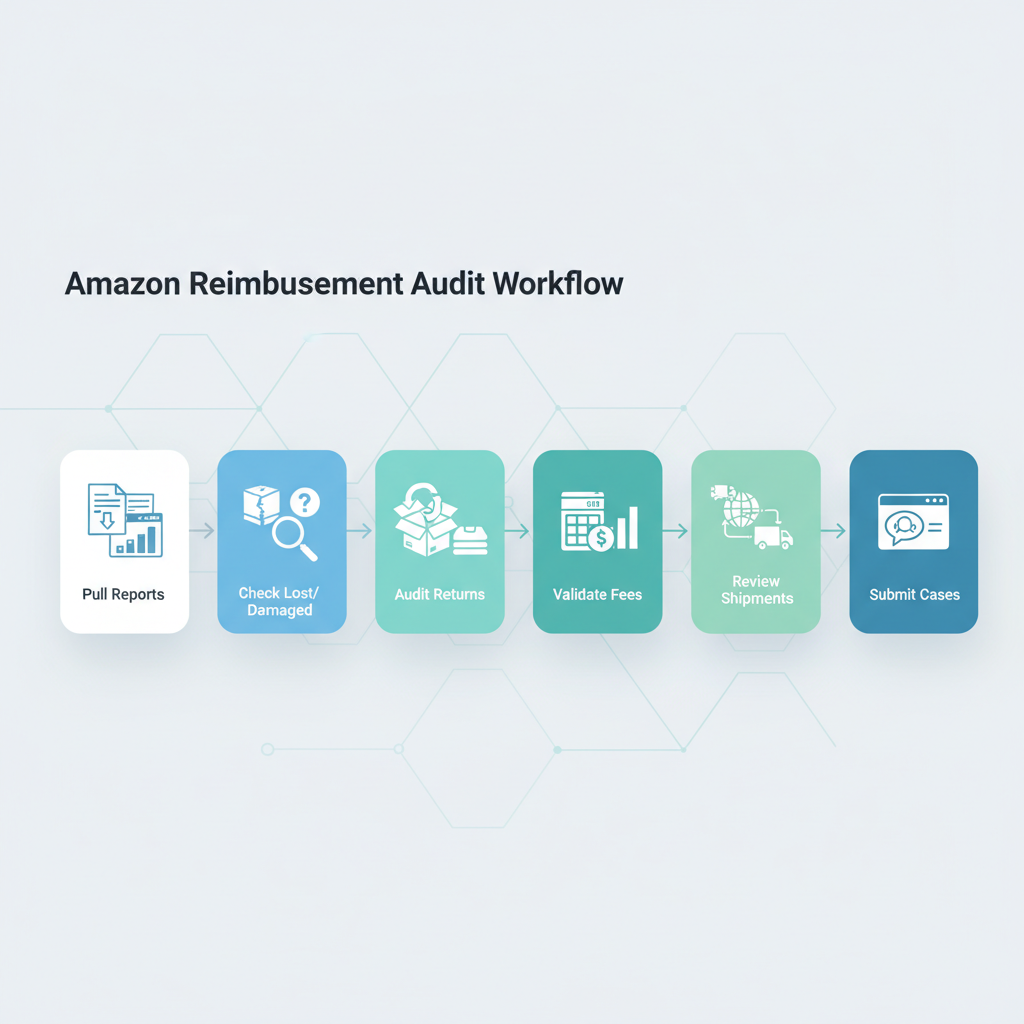
How to run an Amazon reimbursement audit (step-by-step)
You can run an Amazon reimbursement audit manually, semi-manually with spreadsheets and tools, or fully outsource it. Regardless, the process usually follows these steps.
Step 1: Define your audit period
Most reimbursement claims are time-limited.
- Common windows sellers use: 6, 12, or 18 months back
- Actual limits depend on the reimbursement type and Amazon policy
If you haven’t audited before, start with the maximum lookback allowed by Amazon and then move to a regular monthly cadence.
Action: Decide: Are you auditing the last 6, 12, or 18 months? Write it down.
Step 2: Pull the right Amazon reports
Inside Seller Central, under Reports (and often in the FBA reports section), you’ll typically work with:
- Inventory Adjustments report (lost, damaged, found, etc.)
- Inventory Reconciliation report
- Returns reports
- Refund reports
- FBA Customer Returns
- Fulfilled Shipments
- Fee preview / Transaction reports
You’ll export and cross-reference these in a spreadsheet or a specialized tool.
Step 3: Check for inventory discrepancies (lost, damaged, missing)
Focus on events where Amazon:
- Marked units as lost or damaged
- Later marked them as found (or not)
- Didn’t reimburse you or didn’t replace them
Steps:
- Filter for LOST and DAMAGED events in the Inventory Adjustments report.
- See which of those units were never later found.
- Check if Amazon issued a reimbursement.
- For gaps, prepare cases with clear SKU, ASIN, date ranges, and quantities.
Step 4: Audit returns and refunds
Here you’re checking:
- Refunded orders where the item was never received back
- Refunded orders where the item returned was unsellable and you weren’t reimbursed
- Duplicate or incorrect refunds
Steps:
- Export returns + refunds reports for your audit period.
- Match refunded orders to returned inventory events.
- Identify cases where:
- Buyer got money back, but you never got the item or a reimbursement.
- Buyer got a partial refund that doesn’t align with Amazon’s own policies.
Step 5: Validate FBA fees and product dimensions
For this part of the reimbursement audit, you’re comparing:
- Your product’s actual weight and size vs. what Amazon recorded
- The FBA fees Amazon charged vs. what should have been charged
Steps:
- Export a fee preview report or use the FBA fee tool.
- Compare against your actual product specs (measure and weigh yourself).
- Spot SKUs where Amazon has oversized or overweight data.
- Open cases to correct the measurements and request retrospective fee reimbursements if appropriate.
Example:
You discover Amazon has your product logged as 19x14x6 inches when the real dimensions are 9x7x3. That single discovery can drastically lower fees and open the door to historical fee correction.
Step 6: Review shipment discrepancies
Now, zoom in on FBA shipments:
- Pull shipment reports for your audit window.
- Filter for shipments with “shortage” or where received quantity < shipped quantity.
- Cross-check with your own shipping docs, invoices, or carrier proof of delivery.
- For clear mismatches, open cases with:
- Shipment ID
- Date
- SKUs
- Quantity sent vs. received
- Supporting documentation
Step 7: Track everything in a simple audit log
Whether you’re doing your Amazon reimbursement audit solo or with a service, track your claims.
Use a Google Sheet, Airtable, Notion — anything — and log:
- Date of claim
- Claim type (lost inventory, fee error, return issue, etc.)
- SKU/ASIN
- Amount claimed
- Case ID
- Status (open, approved, denied, appealed)
- Amount actually reimbursed
This helps you:
- Avoid duplicate claims (which Amazon really dislikes)
- Measure ROI of your audits
- Improve your processes over time
DIY vs. hiring an Amazon reimbursement audit service
You have three real options:
1. Fully DIY
You (or your team) handle every part:
- Pulling reports
- Reconciling data
- Opening and managing cases
Pros:
- You keep 100% of reimbursements
- You fully control how cases are presented
Cons:
- Time-intensive and repetitive
- Requires good understanding of Amazon’s policies
Best for: Smaller catalogs, data-heavy sellers who enjoy spreadsheets, or teams that already have an ops analyst.
2. Hybrid: Tools + partial outsourcing
You use a reimbursement or analytics tool to:
- Flag likely errors and missing reimbursements
- Automate part of the data crunching
But a person still reviews and submits cases manually.
Pros:
- Speeds up discovery
- Maintains more control and compliance
Cons:
- Still requires time and oversight
- Tool costs + internal labor
Best for: Medium to large sellers who are process-driven but don’t want a fully manual approach.
3. Fully done-for-you reimbursement service
These services typically:
- Connect via API to your Seller Central
- Run ongoing reimbursement audits
- Submit and manage cases for you
- Charge either a percentage of recovered funds or a monthly fee
Pros:
- Almost zero time investment for you
- Expertise in Amazon case language and policy
Cons:
- You share a cut of the reimbursements
- You must vet providers very carefully for EULA compliance and data security
Best for: High-revenue FBA sellers, agencies managing multiple accounts, or anyone whose time is simply better spent on growth than on auditing.
How often should you run an Amazon reimbursement audit?

A simple cadence that works for most sellers:
- Monthly: Light audit for new discrepancies and returns
- Quarterly: Deeper review of fees, shipments, and inventory
- Annually: Full-scale audit, especially before tax and financial reporting
If your volume is high (thousands of orders per month), consider:
- Weekly mini-audits for returns and lost/damaged inventory
Quick compliance notes (because we like your account alive)
When you’re running Amazon reimbursement audits and opening cases, follow some common-sense rules:
- Don’t submit duplicate or obviously invalid claims.
- Keep your communication clear, factual, and polite.
- Attach supporting evidence when possible (screenshots, invoices, shipping docs).
- Respect Amazon’s policies and time limits for each claim type.
Final thoughts: Your money, your responsibility
Amazon is not going to email you saying, “Hey, we might have overcharged you on FBA fees for the last 18 months — want that back?”
Running a regular Amazon reimbursement audit is one of the highest-ROI, lowest-risk activities you can put into your operations playbook. It’s not glamorous, but it’s:
- Real cash back into your business
- Better, cleaner data
- A healthier, more resilient operation
Whether you do it yourself, use tools, or hire a reimbursement audit service, the key is consistency.
Set a cadence.
Create a checklist.
Track your wins.
Your future self — and your profit margin — will thank you.
Leave a Reply