How To Launch Your Own Amazon Store

If you’ve ever thought, “I should really start an Amazon store,” and then immediately opened Netflix instead… this one’s for you.
Because yes, Amazon store creation can absolutely work. But it’s not a slot machine you pull once and magically get passive income forever.
It’s a real business. With real moving parts. And real money on the table.
This guide walks you step‑by‑step through how to create an Amazon store (from scratch), avoid common beginner mistakes, and actually set yourself up to make sales—not just pay fees.
What do we mean by “Amazon store creation”?

“Amazon store” gets used in a few different ways, so let’s get clear:
- Amazon Seller Account – This is your basic seller profile that lets you list products on Amazon Marketplace.
- Amazon Storefront (Stores) – A free, customizable mini-site on Amazon where you showcase your brand, collections, and product lineup (only for brand-registered sellers).
- Amazon FBA vs. FBM – Fulfillment by Amazon (FBA) means Amazon stores, packs, and ships your products. Fulfilled by Merchant (FBM) means you handle fulfillment.
In this post, we’ll walk through:
- Setting up your Amazon seller account
- Choosing FBA or FBM
- Enrolling in Brand Registry so you can build a true Amazon Storefront
- Designing and optimizing your store for sales
Step 1: Decide what you’re actually going to sell
Before you click a single Amazon button, you need a product strategy. Otherwise you’re just paying Amazon for a very expensive hobby.
1. Pick a business model
Common ways new sellers approach Amazon:
- Private label – You create your own brand, work with a manufacturer (often overseas), and sell a unique or improved version of an existing product.
- Wholesale – You buy branded products in bulk from authorized distributors and resell them on Amazon.
- Retail or online arbitrage – You buy discounted products from other retailers and resell them for a profit.
- Print on demand – You design graphics or text and a third-party prints and ships on demand.
For long-term brand building and a real Amazon store, private label is usually the best fit.
2. Do basic product research (no guesswork)
Look for products that hit roughly these criteria:
- Steady demand (consistent monthly sales, not just a holiday spike)
- Not dominated by huge, entrenched brands
- Room for differentiation (better bundle, color, design, material, or instructions)
- Manageable size and weight (cheaper shipping and FBA fees)
You can use Amazon’s own Best Sellers, New Releases, and Movers & Shakers categories to spot opportunities. Add a few competitors to your list and study:
- Price range
- Review count & average rating
- What customers complain about in reviews (that’s your improvement roadmap)
Step 2: Create your Amazon Seller Central account
Now to the actual Amazon store creation part.
Individual vs. Professional plan
When you register on Amazon Seller Central, you’ll choose:
- Individual plan – No monthly subscription, but you pay a per-item fee on each sale. Good for very low volume or testing.
- Professional plan – A flat monthly fee, but no per‑item fee. Required if you want:
- Advanced selling tools
- Access to certain categories
- Bulk listing and ads
- Brand Registry and Stores
If you’re serious about building a brand and Amazon storefront, the Professional plan is the right move.
What you need to register
Amazon Seller Central signup checklist
- Business name and address (can be an LLC or sole prop; talk to a tax pro if unsure)
- Phone number
- Valid government ID
- Bank account and routing details for payouts
- Credit card for fees
- Tax information (SSN or EIN for U.S. sellers)
Once approved, you’ll have access to Seller Central—your dashboard for inventory, pricing, ads, customer messages, and reports.
Step 3: Choose FBA vs. FBM (how your store actually works)
Think of this as deciding who runs your warehouse.
Fulfillment by Amazon (FBA)
You ship inventory to Amazon warehouses. Amazon:
- Stores your products
- Packs and ships orders
- Handles customer service and returns
Pros:
- Your products can qualify for Prime shipping
- Fast delivery boosts conversion rates
- Less day‑to‑day logistics work for you
Cons:
- Storage and fulfillment fees
- Less control over packaging details
- You need to send inventory in bulk
Fulfilled by Merchant (FBM)
You (or a 3PL partner) store, pack, ship, and handle returns.
Pros:
- More control over packaging and customer experience
- Can be cheaper for heavy, slow‑moving, or oversized items
Cons:
- No automatic Prime (unless enrolled in special programs)
- More operational work on your plate
Step 4: Create your first product listings the right way

No listing = no sales, no matter how pretty your brand idea is.
Key parts of a high‑converting Amazon listing
- Product title
- Include: main keyword, brand name, core benefit, size/variant
- Make it readable—don’t just stuff it with every keyword you can think of.
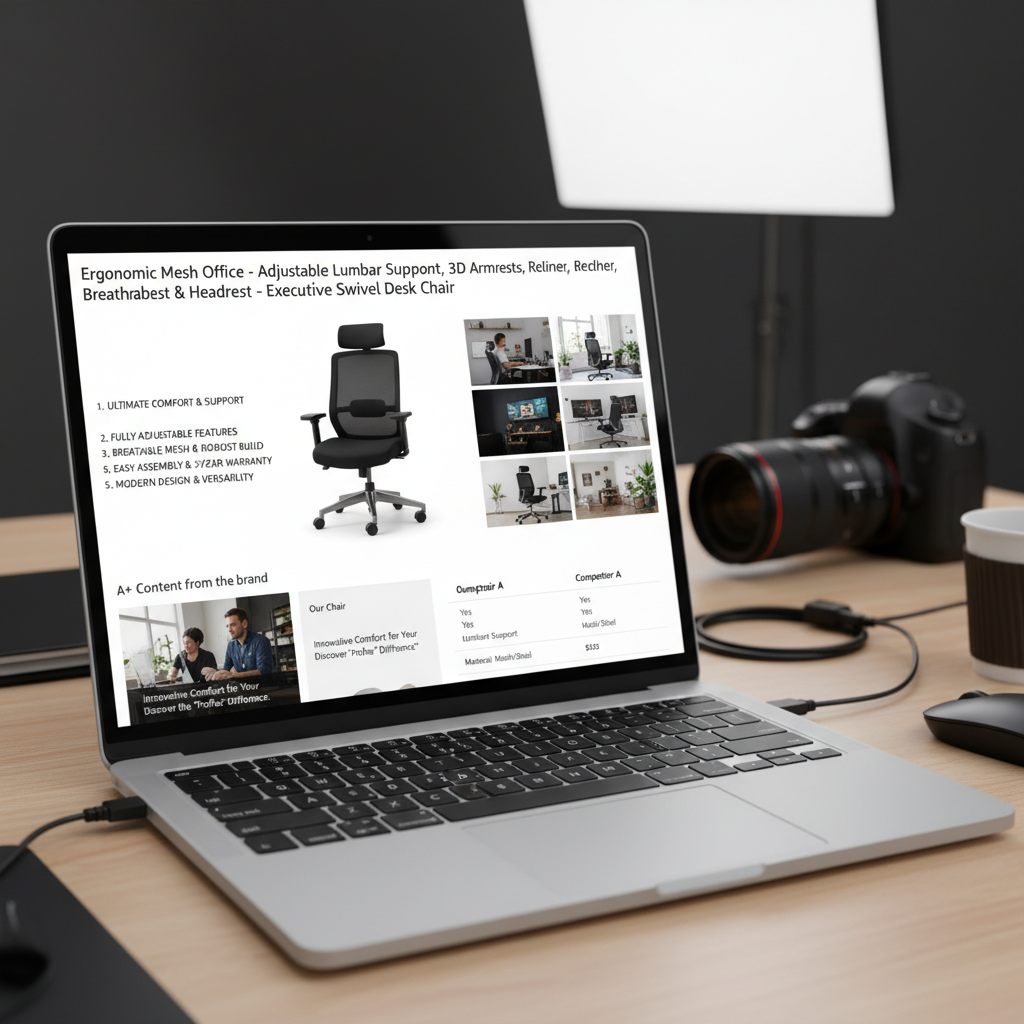
- Images
- Clean, clear white background main image
- Lifestyle shots (product in use)
- Infographic images with dimensions, features, and benefits
- Bullet points
- Highlight benefits, not just features
- Answer objections (size, compatibility, materials, warranty)
- Product description / A+ Content
- If you’re brand registered, you can add enhanced images and comparison charts
- Tell a mini brand story and help buyers visualize using the product
- Backend keywords
- Fill in search terms customers might use that you couldn’t naturally fit in the listing text
If you’re selling a resistant band set, your title might be something like:
“FitFlow Resistance Bands Set – 5 Levels, Non‑Slip Fabric Exercise Bands for Home Workouts, Glutes & Legs – Carry Bag Included”
Not: “FITFLOW BANDS BEST BAND SET RESISTANCE BOOTY HIP GLUTE EXERCISE CROSSFIT YOGA PILATES HOME GYM WORKOUT FITNESS WOMEN MEN” (please don’t be that seller).
Step 5: Enroll in Brand Registry (so you can build a true Amazon Storefront)
If your goal is a branded Amazon store—not just a random listing—you’ll want Amazon Brand Registry.
What is Amazon Brand Registry?
Brand Registry lets you:
- Protect your brand and intellectual property
- Access Amazon Stores (your multi-page branded storefront)
- Use A+ Content (enhanced product descriptions)
- Run Sponsored Brands ads that point to your store
What you need
Requirements vary by region, but typically you’ll need:
- A registered and active trademark for your brand name (or at least a filed application in some programs)
- Proof that you own that brand (website, packaging photos, etc.)
Once Amazon approves you, you can access the Stores builder in Seller Central.
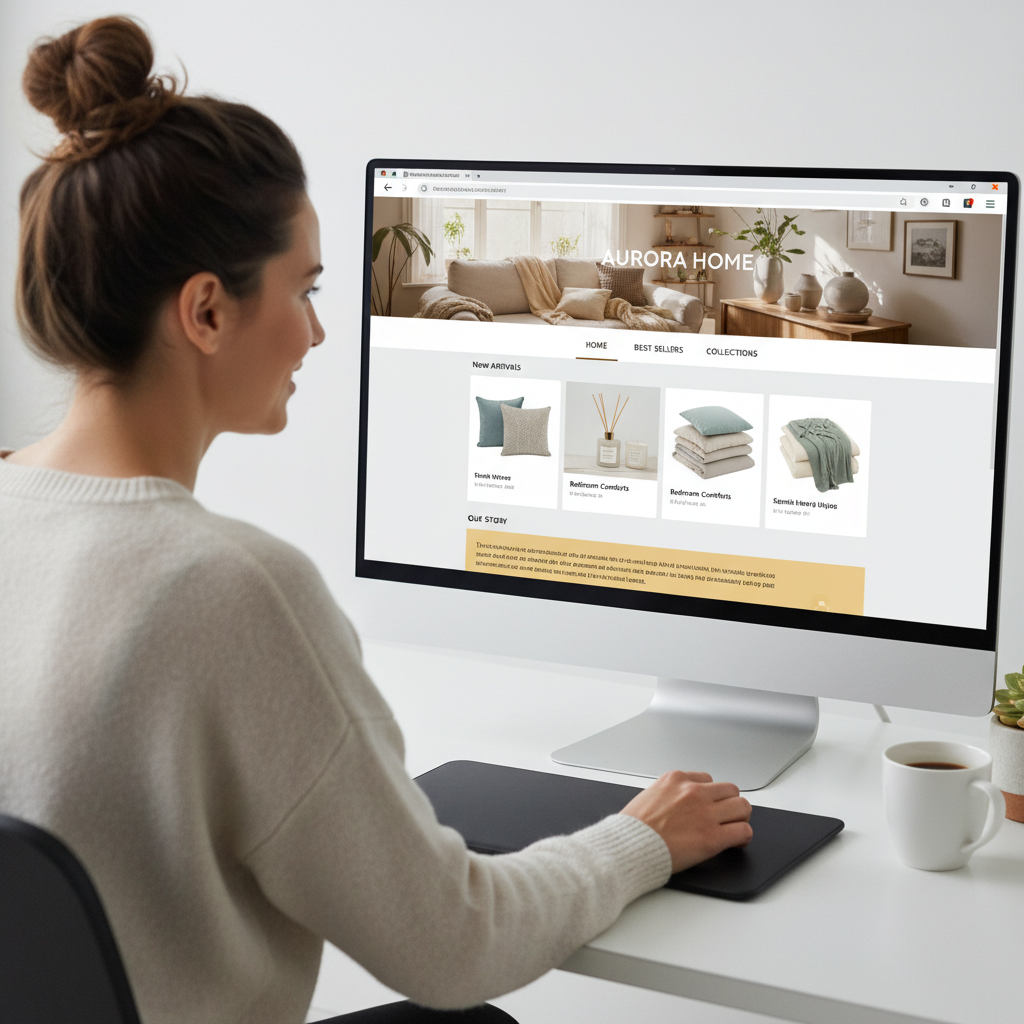
Step 6: Build your Amazon Storefront (your brand’s home base on Amazon)
This is the fun part—actual Amazon store creation.
How to set up your Storefront
- In Seller Central, go to Stores → Manage Stores → Create Store.
- Choose your brand.
- Pick a template (product grid, showcase, etc.).
- Add:
- Header logo and banner image
- Navigation (e.g., Home, Best Sellers, New Arrivals, By Category)
- Content tiles: product grids, images, videos, text blocks
Best practices for a high-performing Amazon Store
- Keep it on-brand – Use your brand colors, logo, and consistent photography style.
- Organize like a real website – Use clear category pages: “By Use Case,” “By Collection,” “Gift Ideas,” etc.
- Feature social proof – Highlight best-sellers, high‑review items, or collections like “Top Rated.”
- Tell a short story – A “Our Story” or “Why We Exist” section can help buyers feel good about choosing you.
Example store structure for a home fitness brand:
- Home
- Resistance Bands
- Yoga Accessories
- Bundles & Gift Sets
- New Arrivals
Step 7: Drive traffic and sales to your Amazon store
You’ve built the store. Now you need, you know… people.
Amazon PPC (pay-per-click ads)
Start with:
- Sponsored Products – Promote individual listings in search results.
- Sponsored Brands – Send shoppers to your Amazon Storefront or a product collection.
Tips for new sellers:
- Begin with automatic campaigns to discover relevant search terms.
- Use that data to build manual campaigns focused on your best keywords.
- Set a realistic daily budget and test gradually—don’t assume more spend = guaranteed profit.
External traffic (off Amazon)
You can also send traffic from:
- TikTok, Instagram Reels, YouTube
- Your own email list or website
- Influencer or affiliate campaigns
If your brand is new, even a simple TikTok strategy like “short, no‑frills demos + Amazon link in bio” can start moving the needle.
Step 8: Optimize your store using data (not vibes)
Once you’re getting even a little traffic, Amazon starts feeding you precious data.
Watch:
- Conversion rate – If traffic is high but sales are low, fix your listing: images, price, reviews, offer.
- Search term reports – Which keywords actually convert? Lean into those and trim the losers.
- Store insights – For your Storefront, check which pages get the most views and drive the most sales.
Small, consistent tweaks beat massive random overhauls. Example:
- Swap your main image and watch conversion for 1–2 weeks.
- Test a small price change.
- Add one new lifestyle image and see if it lifts results.
Three quick mini case studies (so this feels real)
1. The niche kitchen brand
A small U.S. brand launched a line of specialized baking tools. They:
- Started with 3 SKUs using FBA
- Focused heavily on premium photos and clear benefits
- Built a Storefront that grouped products by skill level (“Beginner Bakers,” “Serious Home Bakers”)
Result: their average order value climbed because buyers discovered complementary tools on the Storefront instead of just buying one item.
2. The fitness side hustle
One seller started with a single resistance band set, then:
- Enrolled in Brand Registry after getting a trademark started
- Added A+ Content and a Store page themed around “Small Space Workouts”
- Ran Sponsored Brands ads driving traffic to that Store section
Result: their brand went from “random bands” to a recognizable micro‑brand people searched by name.
3. The seasonal décor seller
A maker of seasonal decorations used FBM at first from their own garage. When they:
- Switched their top SKUs to FBA before Q4
- Built an Amazon Store organized by holiday
Result: They saw a big bump in Prime‑driven sales and repeat buyers who used their Store to shop multiple holidays.
Common mistakes to avoid when creating your Amazon store
Save yourself some pain and skipped heartbeats:
- Random product selection – Chasing trends without data usually ends in dead inventory.
- Terrible photos – Dark, cluttered images scream “don’t trust this.” Invest in good visuals.
- Ignoring fees – FBA, referral, storage, ads—run the numbers before you price.
- No review strategy – Don’t buy fake reviews (Amazon is ruthless about this), but do use follow‑up emails, great packaging, and customer service to earn real reviews.
- Building a Storefront too early – If you only have one product and no clear brand angle yet, focus first on getting that listing dialed in.
Is creating an Amazon store still worth it?
Let’s be honest: Amazon is more competitive than it was five or ten years ago.
But that also means the people who treat it like a real brand and real business still win.
An Amazon store can absolutely be worth it if:
- You do the upfront product research
- You invest in branding, photos, and good listings
- You understand your numbers (costs, margins, ad spend)
- You’re willing to keep learning and adjusting
If you’re just hoping to slap up a product and print money… probably not.
Your simple next steps (today, not “someday”)
- Choose a niche + product idea to research this week.
- Create a free Amazon Seller Central account and explore the dashboard.
- Map out what you’d need for Brand Registry (trademark, brand name, basic visual identity).
- Draft one product listing in a doc—title, bullets, and image ideas.
You don’t need to have the entire empire built today.
You just need to take the first boring, unsexy step.
That’s how every real Amazon store starts.
Leave a Reply